C++ and C for Python#
The slow Python is a key feature to make a fast computation system. While making everything fast can theoretically make a fast system, it does not work in reality.
Speedup has to be done step by step. One hotspot a time, identify what takes the most runtime and adjust the system. After one thing is sped up, new hotspots surface. The software structure changes, so does the runtime.
The high-level, highly flexible Python will help adjust the structure quickly. C++ is not suitable for the quick change. A fast system will need both Python and C++.
Python to Control Workflow#
Python helps us focus on the problem-solving workflow. The flexibility lets us quickly implement high-level operations. Making things work quickly, correctly, and clearly is the key. Coding quickly allows us to iterate at a fast pace. When there is an issue (there is always an issue!) we can quickly fix them.
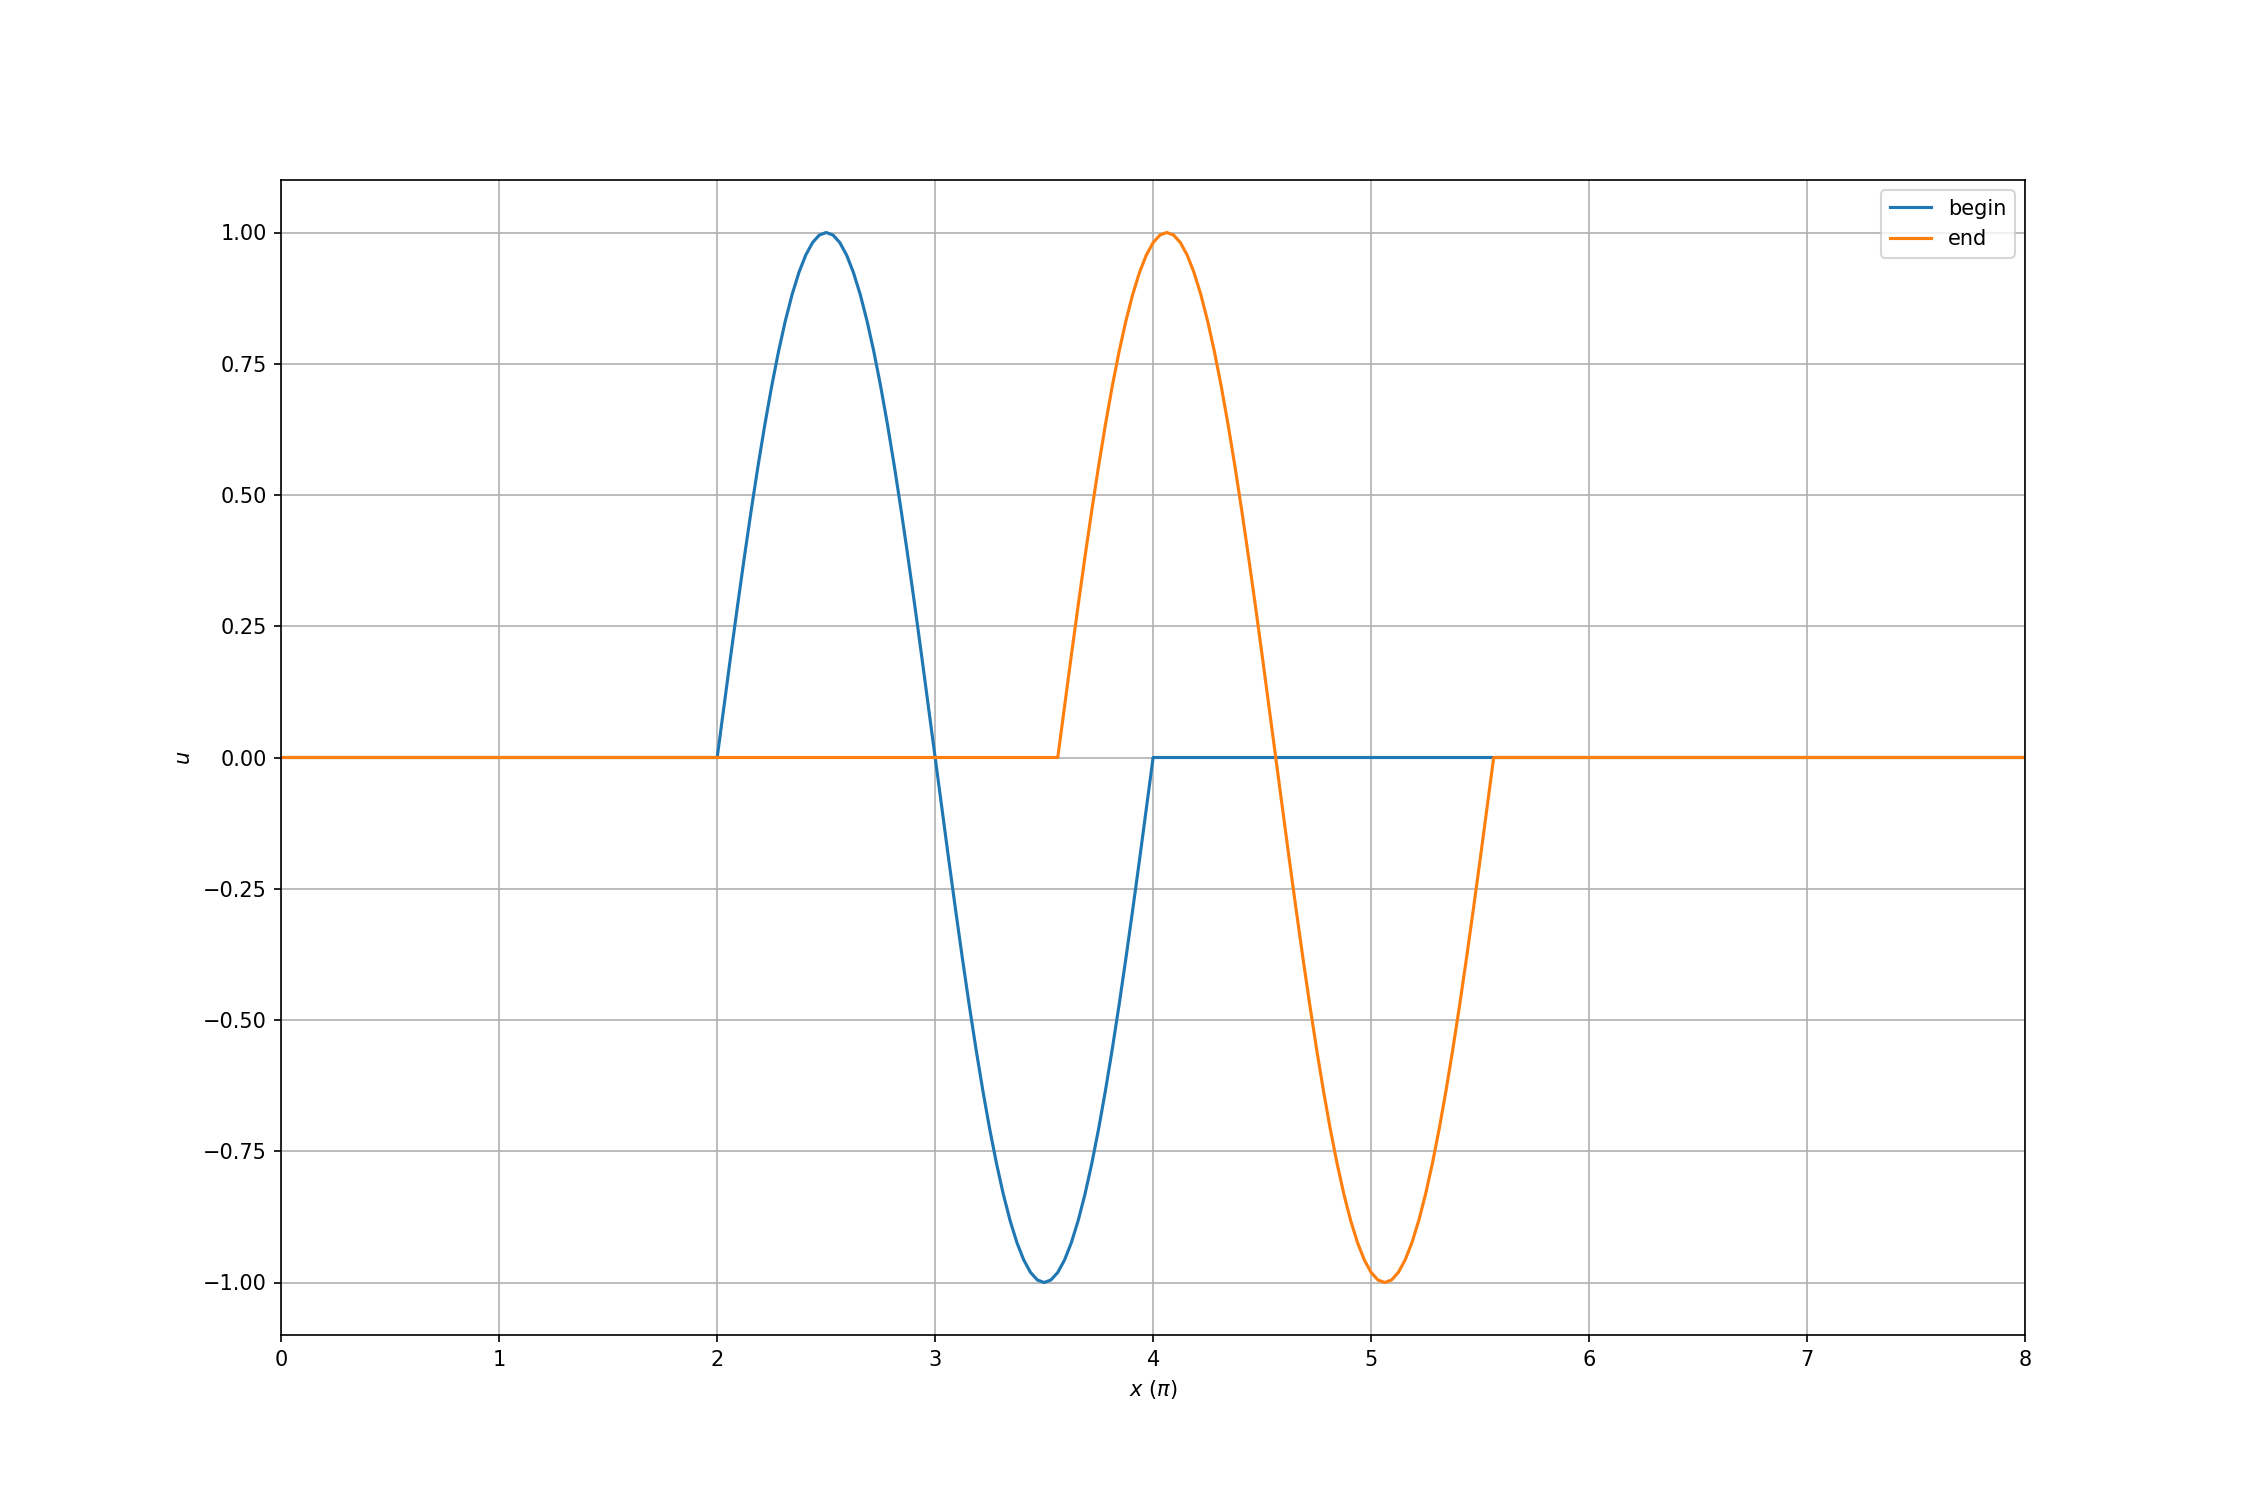
Let us see how it works by using the high-level code written to clearly describe a problem regardless of your familiarity. This is a linear wave equation that governs how waves propagate.
Assuming a sinusoidal wave is given by the initial condition. By solving the partial differential equation (PDE), we will see the solution propagating from left to right with the phase velocity of unity.
The solution uses 6 steps in the flow: (1) import functional modules, (2) build grid, (3) initialize field, (4) configure visualization, (5) compute, and (6) visualize.
The first step is to include necessary code for the solution. The Python script does not contain code for the heavy-lifting calcuation, so it needs to include the helper code implemented elsewhere.
# numpy is fundamental to the data processing
import numpy as np
# matplotlib is to visualize
from matplotlib import pyplot as plt

# libst is the calculation code we wrote in C++
import libst
In the second step, we create the grid. The grid is the discretized space for the numerical method that solves for the differential equation. The differential equation is in a one-dimensional space, so the grid is a one-dimensional array for the coordinate.
# Build the one-dimensional uniform grid and the corresponding solver
grid = libst.Grid(0, 4*2*np.pi, 4*64)
cfl = 1
dx = (grid.xmax - grid.xmin) / grid.ncelm
dt = dx * cfl
svr = libst.LinearScalarSolver(grid=grid, time_increment=dt)
In the third step, initialize the solution field using the initial condition to
the differential equation. The solver object (svr) holds the array for the
solution field (the variable \(u\)). The code below initializes the field
by setting the value in each of the elements.
# Initialize the field using a sinusoidal
for e in svr.selms(odd_plane=False):
    if e.xctr < 2*np.pi or e.xctr > 2*2*np.pi:
        v = 0
        dv = 0
    else:
        v = np.sin(e.xctr)
        dv = np.cos(e.xctr)
    e.set_so0(0, v)
    e.set_so1(0, dv)
In the fouth step, set up matplotlib to prepare for plotting. It involves how matplotlib API. We create the figure, set up the value limit, axis labels, and other appearance settings of the plot.
# Set up plotting
plt.figure(figsize=(15,10))
plt.xlim((0, 8))
plt.xlabel('$x$ $(\pi)$')
plt.ylabel('$u$')
plt.grid()
Then plot the solution data at the initial condition before starting the calculation in the next step.
# Plot the initial condition
plt.plot(svr.xctr() / np.pi, svr.get_so0(0).ndarray, '-', label='begin')
In the fifth step, launch the solver and run the calculation. The equation has
a temporal term and the solver delivers time-accurate solution. In this sense,
the calculation is also called time-marching. We specify the number of steps
as an argument to the marching function march_alpha2().
# Time march
svr.setup_march()
svr.march_alpha2(50)
In the sixth (last) step, plot the calculated data.
# Plot the time marched solution
plt.plot(svr.xctr() / np.pi, svr.get_so0(0).ndarray, '-', label='end')
Add legend in the plot. We want to have the legend for both the initial
condition (begin) and the final solution (end).
plt.legend()
Running the script will create the plot like below.
Bridge between Python and C++#
To use code written in C++, we need a bridge. Python used to be called a glue language for its ability to easily work with C. The Python interpreter is implemented by using C, and may be used as a C library that implements an interpreter pattern.
The bridge between Python and C++ is a way to call the C API of Python (CPython API) from C++ to execute the Python code. It allows us to call into C and C++ code from Python, and also call into Python code from C and C++. We can also operate Python objects from C and C++, and vice versa.
After the industry adopted C++11 (the so-called modern C++), pybind11 became the de facto Python wrapping tool. It is a header-only C++ template library, providing C++-friendly semantics for Python to use C++ constructs and vise versa.
Build pybind11#
When saying to “build” pybind11, we mean to build the C++ project that uses it. A header-only library like pybind11 does not really have binary to be built.
To make pybind11 work for numerical code, we also need to have CPython and numpy. You need to install pybind11. Follow the pybind11 document to install it.
The preferred way to build pybind11 is to use cmake. See the pybind11 document to build with cmake. This is a simple example adapted from the pybind11 document.
In the CMakeLists.txt, specify the required cmake version and the project
name:
# Set the required cmake version.
cmake_minimum_required(VERSION 3.15...4.0)
# Set cmake project name.
project(example LANGUAGES CXX)
Then find the pybind11 package you installed:
# Find pybind11 package installed in the system.
set(PYBIND11_FINDPYTHON ON)
find_package(pybind11 CONFIG REQUIRED)

# Alternately, you may provide an option to specify the path to pybind11:
#option(pybind11_path "pybind11 path")
#find_package(pybind11 CONFIG REQUIRED PATHS ${pybind11_path})
Then add the C++ source file to create the Python extension module:
# Create a pybind11 module.
pybind11_add_module(example example.cpp)
Use the install command to create the file for the extension module:
install(TARGETS example DESTINATION .)
Glue Abstraction#
Adding an abstract layer between your (wrapping) code and the wrapping tool (pybind11) allows you to control everything when developing the computing system. Although high-performance computing is paranoid about indirect constructs because of their runtime cost, a wrapping layer over the pybind11 wrapping code is fine, because it will not be run twice in a process.
The glue abstraction is C++ code, allowing to insert additional treatment in a systematic way.
Base Class for Wrapping Code#
Classes are the most pragmatic tool to organize many functions in Python and C++. So our glue abstraction will be built upon the assumption: The wrapping code focuses on classes.
The assumption widely applies to numerical code. The most viable way to organize the logic around processsing large amount of data is object-oriented programming. Most of the code takes the form of class member functions.
We use a base class template, WrapBase, on top of pybind11 to expose the
object-oriented C++ code to Python. It takes template arguments for the derived
wrapper class (Wrapper) and the wrapped class (Wrapped). It also takes
two optional template arguments for the custom holder type (Holder) to
manage the lifecycle of the wrapped object, and the wrapped base class
(WrappedBase).
WrapBase for custom wrappers.#template
<
class Wrapper
, class Wrapped
/* The default holder type is a unique pointer. */
, class Holder = std::unique_ptr<Wrapped>
, class WrappedBase = Wrapped
>
class
WrapBase
{
private:
// This "class_" is the alias we made above, not directly the pybind11::class_.
class_ m_cls;
}; /* end class WrapBase */
The base wrapper class has a member datum m_cls of the type
pybind11::class_, so that we can call pybind11 wrapping helpers through it.
The real wrapping code will be written in the derived classes of WrapBase.
WrapBase provides commonly used type aliases for the wrapping code in the
derived class can be shared more easily.
WrapBase.#public:
// These type aliases helps share code among the derived (wrapper) classes.
using wrapper_type = Wrapper;
using wrapped_type = Wrapped;
using wrapped_base_type = WrappedBase;
using holder_type = Holder;
using root_base_type = WrapBase
<
wrapper_type
, wrapped_type
, holder_type
, wrapped_base_type
>;
// If the wrapped base type is not the same as the wrapped type, pybind11 needs to know.
using class_ = typename std::conditional
<
std::is_same< Wrapped, WrappedBase >::value
, pybind11::class_< wrapped_type, holder_type >
, pybind11::class_< wrapped_type, wrapped_base_type, holder_type >
>::type;
Make WrapBase a Singleton#
There should be only one instance of the conversion code between Python and C++. It does not make sense to have multiple instances of the same wrapper class. Only one can and should be executed.
WrapBase should be made a singleton class. The static member function
commit() uses the Meyers’ singleton pattern and returns the only instance of
the derived wrapper class. C++11 standard guarantees thread-safety of the
static variable derived. The only constructor of WrapBase is protected
so that the derived wrapper_type can call it.
WrapBase a singleton.#public:
static wrapper_type & commit
(
pybind11::module * mod
, const char * pyname
, const char * clsdoc
)
{
static wrapper_type derived(mod, pyname, clsdoc);
return derived;
}
WrapBase() = delete;
WrapBase(WrapBase const & ) = delete;
WrapBase(WrapBase &&) = delete;
WrapBase & operator=(WrapBase const & ) = delete;
WrapBase & operator=(WrapBase &&) = delete;
~WrapBase() = default;
protected:
// The constructor will be called from the derived class.
WrapBase(pybind11::module * mod, const char * pyname, const char * clsdoc)
: m_cls(*mod, pyname, clsdoc)
{}
Since the wrapper class is a singleton, we delete both the copy and move. The default constructor is also deleted.
Add pybind11 wrapping API to WrapBase#
Pybind11 has wrapping helpers defined on pybind11::class_. To make them
available in WrapBase, we use macros to avoid repeating code.
WrapBase member functions.#public:
// Define the macros to graft pybind11 class API.
#define DECL_MM_PYBIND_CLASS_METHOD_UNTIMED(METHOD) \
template <class... Args> \
wrapper_type & METHOD(Args &&... args) \
{ \
m_cls.METHOD(std::forward<Args>(args)...); \
return *static_cast<std::add_pointer_t<wrapper_type>>(this); \
}
#define DECL_MM_PYBIND_CLASS_METHOD_TIMED(METHOD) \
template <class... Args> \
wrapper_type & METHOD##_timed(Args &&... args) \
{ \
m_cls.METHOD(std::forward<Args>(args)..., mmtag()); \
return *static_cast<std::add_pointer_t<wrapper_type>>(this); \
}
#define DECL_MM_PYBIND_CLASS_METHOD(METHOD) \
DECL_MM_PYBIND_CLASS_METHOD_UNTIMED(METHOD) \
DECL_MM_PYBIND_CLASS_METHOD_TIMED(METHOD)
DECL_MM_PYBIND_CLASS_METHOD(def)
DECL_MM_PYBIND_CLASS_METHOD(def_static)
DECL_MM_PYBIND_CLASS_METHOD(def_readwrite)
DECL_MM_PYBIND_CLASS_METHOD(def_readonly)
DECL_MM_PYBIND_CLASS_METHOD(def_readwrite_static)
DECL_MM_PYBIND_CLASS_METHOD(def_readonly_static)
DECL_MM_PYBIND_CLASS_METHOD(def_property)
DECL_MM_PYBIND_CLASS_METHOD(def_property_static)
DECL_MM_PYBIND_CLASS_METHOD(def_property_readonly)
DECL_MM_PYBIND_CLASS_METHOD(def_property_readonly_static)
DECL_MM_PYBIND_CLASS_METHOD_UNTIMED(def_buffer)
// Delete the macros after they should not be used anymore.
#undef DECL_MM_PYBIND_CLASS_METHOD_UNTIMED
#undef DECL_MM_PYBIND_CLASS_METHOD_TIMED
#undef DECL_MM_PYBIND_CLASS_METHOD
C pre-processor macros are often used to remove duplicated code like this. But it will be bad if the macros are left in the global scope and pollute it. To prevent that, we undefine them after use. For the same reason, we use long names for them, so that even if we forget to undefine them, they will not likely to cause name collision.
To have the class template WrapBase allows us to add handy wrapping API like
def_alias. It is particularly useful when we want to provide compatibility
layer when renaming a already exposed C++ function.
WrapBase member functions.#public:
wrapper_type & def_alias(char const * from_name, char const * to_name)
{
cls().attr(to_name) = cls().attr(from_name);
return *static_cast<std::add_pointer_t<wrapper_type>>(this);
}
Wrappers for Data Classes#
The “turgon” code is built upon several data classes. The most basic one is
the grid definition class Grid. Its wrapper is the simplest:
Grid.#class
SPACETIME_PYTHON_WRAPPER_VISIBILITY
WrapGrid
: public WrapBase< WrapGrid, Grid, std::shared_ptr<Grid> >
{
// Need this friendship to access the protected constructor in the base class.
friend base_type;
WrapGrid(pybind11::module * mod, const char * pyname, const char * clsdoc)
: base_type(mod, pyname, clsdoc)
{
namespace py = pybind11;
(*this)
.def
(
py::init
(
[](real_type xmin, real_type xmax, size_t nelm)
{
return Grid::construct(xmin, xmax, nelm);
}
),
py::arg("xmin"), py::arg("xmax"), py::arg("nelm")
)
.def
(
py::init
(
[](xt::pyarray<wrapped_type::value_type> & xloc)
{
return Grid::construct(xloc);
}
),
py::arg("xloc")
)
.def("__str__", &detail::to_str<wrapped_type>)
.def_property_readonly("xmin", &wrapped_type::xmin)
.def_property_readonly("xmax", &wrapped_type::xmax)
.def_property_readonly("ncelm", &wrapped_type::ncelm)
.def_property_readonly("nselm", &wrapped_type::nselm)
.def_property_readonly
(
"xcoord",
static_cast<wrapped_type::array_type & (wrapped_type::*)()>
(&wrapped_type::xcoord)
)
.def_property_readonly_static
(
"BOUND_COUNT"
, [](py::object const &){ return Grid::BOUND_COUNT; }
)
;
}
}; /* end class WrapGrid */
When there are overloads in the C++ code, sometimes we may need to specify the
function signature using static_cast like that in (highlighted) line 45.
An alternate way is to use a lambda expression.
A slightly more complex wrapper is for the class Field. In
(highlighted) line 19, a Grid is returned from the wrapper of
Field.
Field.#1 2 3 4 5 6 7 8 9 10 11 12 13 14 15 16 17 18 19 20 21 22 23 24 25 26 27 28 29 30 31 32 33 34 35 36 37 38 39 40 41 42 43 44 45 46 47 48 | class
SPACETIME_PYTHON_WRAPPER_VISIBILITY
WrapField
: public WrapBase< WrapField, Field, std::shared_ptr<Field> >
{
// Need this friendship to access the protected constructor in the base class.
friend base_type;
WrapField(pybind11::module * mod, const char * pyname, const char * clsdoc)
: base_type(mod, pyname, clsdoc)
{
namespace py = pybind11;
(*this)
.def("__str__", &detail::to_str<wrapped_type>)
.def_property_readonly
(
"grid"
, [](wrapped_type & self){ return self.grid().shared_from_this(); }
)
.def_property_readonly("nvar", &wrapped_type::nvar)
.def_property
(
"time_increment"
, &wrapped_type::time_increment
, &wrapped_type::set_time_increment
)
.def_property_readonly("dt", &wrapped_type::dt)
.def_property_readonly("hdt", &wrapped_type::hdt)
.def_property_readonly("qdt", &wrapped_type::qdt)
.def
(
"celm",
static_cast<Celm (wrapped_type::*)(sindex_type, bool)>
(&wrapped_type::celm_at<Celm>)
, py::arg("ielm"), py::arg("odd_plane")=false
)
.def
(
"selm",
static_cast<Selm (wrapped_type::*)(sindex_type, bool)>
(&wrapped_type::selm_at<Selm>)
, py::arg("ielm"), py::arg("odd_plane")=false
)
;
}
}; /* end class WrapField */
|
Hierarchical Wrapper#
The “turgon” code defines a hierarchy of classes and wrapping them does not
only require WrapBase, but also other class templates between
WrapBase and the concrete wrappers.
For example, the following Solver and uses
WrapSolverBase (which is not shown in the notes). Because
WrapSolver does not directly inherit from WrapBase, it needs more aliases than the previous use cases.
Solver.#class
SPACETIME_PYTHON_WRAPPER_VISIBILITY
WrapSolver
: public WrapSolverBase< WrapSolver, Solver >
{
// The base class becomes more complex.
using base_type = WrapSolverBase< WrapSolver, Solver >;
using wrapper_type = typename base_type::wrapper_type;
using wrapped_type = typename base_type::wrapped_type;
// Need these friendships to access the protected constructor in the base class.
friend base_type;
friend base_type::base_type;
WrapSolver(pybind11::module * mod, const char * pyname, const char * clsdoc)
: base_type(mod, pyname, clsdoc)
{
namespace py = pybind11;
(*this)
.def
(
py::init
(
static_cast
<
std::shared_ptr<wrapped_type> (*)
(
std::shared_ptr<Grid> const &
, typename wrapped_type::value_type
, size_t
)
>
(&wrapped_type::construct)
)
, py::arg("grid"), py::arg("time_increment"), py::arg("nvar")
)
;
}
}; /* end class WrapSolver */
Wrappers for Element Classes#
The following WrapCelm and WrapSelm are wrapper classes for elements in the “turgon” code.
They use WrapCelmBase and WrapSelmBase (which are
not shown in the notes), respectively.
The element wrappers are not very different from data wrappers, but we should keep in mind that there may be many more element objects than data objects in the system. The element objects are implemented as handles and their data are stored in the data objects.
Celm.#class
SPACETIME_PYTHON_WRAPPER_VISIBILITY
WrapCelm
: public WrapCelmBase< WrapCelm, Celm >
{
// The base class becomes more complex.
using base_type = WrapCelmBase< WrapCelm, Celm >;
// Need this friendship to access the protected constructor in the base class.
friend base_type::base_type::base_type;
WrapCelm(pybind11::module * mod, const char * pyname, const char * clsdoc)
: base_type(mod, pyname, clsdoc)
{
namespace py = pybind11;
(*this)
... wrapper code ...
;
}
}; /* end class WrapCelm */
Selm.#class
SPACETIME_PYTHON_WRAPPER_VISIBILITY
WrapSelm
: public WrapSelmBase< WrapSelm, Selm >
{
// The base class becomes more complex.
using base_type = WrapSelmBase< WrapSelm, Selm >;
// Need this friendship to access the protected constructor in the base class.
friend base_type::base_type::base_type;
WrapSelm(pybind11::module * mod, const char * pyname, const char * clsdoc)
: base_type(mod, pyname, clsdoc)
{
namespace py = pybind11;
(*this)
... wrapper code ...
;
}
}; /* end class WrapCelm */
Define the Extension Module#
So far, we have used WrapperBase to save some
duplicated code, but more can be saved. Another important use of it is to
reduce the .cpp file used for the Python extension. The function template
add_solver() (which is not shown in the notes) takes advantage of
the commonality of the wrapper classes and significantly shortens the code.
#include "spacetime/python.hpp" // must be first
#include "spacetime.hpp"

PYBIND11_MODULE(_libst, mod)
{
    namespace spy = spacetime::python;
    spy::ModuleInitializer::get_instance()
        .add_solver
        <
            spy::WrapSolver, spy::WrapCelm, spy::WrapSelm
        >
        (&mod, "", "no equation")
        .add_solver
        <
            spy::WrapLinearScalarSolver
          , spy::WrapLinearScalarCelm
          , spy::WrapLinearScalarSelm
        >
        (&mod, "LinearScalar", "a linear scalar equation")
        .add_solver
        <
            spy::WrapInviscidBurgersSolver
          , spy::WrapInviscidBurgersCelm
          , spy::WrapInviscidBurgersSelm
        >
        (&mod, "InviscidBurgers", "the inviscid Burgers equation")
        .initialize(&mod)
    ;
}
pybind11 Wrapping API#
pybind11 provides API to wrap between C++ and Python.
Function and Property#
Let’s use the Grid class as an example to demonstrate how to
expose functions and properties. We have a constructor:
.def
(
    py::init
    (
        [](real_type xmin, real_type xmax, size_t nelm)
        {
            return Grid::construct(xmin, xmax, nelm);
        }
    )
  , py::arg("xmin"), py::arg("xmax"), py::arg("nelm")
)
It allows creating the Grid object from Python:
>>> grid = libst.Grid(0, 8, 4*64)
By wrapping for the special function __str__():
.def("__str__", &detail::to_str<wrapped_type>)
It allows to support str for Grid:
>>> print('call str(Grid):', str(grid))
call str(Grid): Grid(xmin=0, xmax=8, ncelm=256)
>>> print('directly call Grid.__str__():', grid.__str__())
directly call Grid.__str__(): Grid(xmin=0, xmax=8, ncelm=256)
Define properties. pybind11 supports both instance properties and static properties:
.def_property_readonly("xmin", &wrapped_type::xmin)
.def_property_readonly("xmax", &wrapped_type::xmax)
.def_property_readonly_static
(
    "BOUND_COUNT"
  , [](py::object const &){ return Grid::BOUND_COUNT; }
)
Check the properties from the instance:
>>> print(grid.BOUND_COUNT)
2
>>> print(grid.xmin)
0.0
>>> print(grid.xmax)
8.0
Check the properties from the class:
>>> print(libst.Grid.BOUND_COUNT)
2
>>> print(libst.Grid.xmin)
<property object at 0x110e9ffb0>
>>> print(libst.Grid.xmax)
<property object at 0x110ea60b0>
Define a pure Python class that can be compared with the pybind11 wrapped class:
class PythonGrid:
    BOUND_COUNT = 2
    @property
    def xmin(self):
        return 0
    @property
    def xmax(self):
        return 8
Compare the execution results with that of the C++ Grid. They
are identical:
>>> print(PythonGrid.BOUND_COUNT)
2
>>> print(PythonGrid.xmin)
<property object at 0x1112daad0>
>>> print(PythonGrid.xmax)
<property object at 0x1112dab30>
Here is a list of property-related API:
def_property_readonlyanddef_property_readonly_staticfor read-only properties with C++ accessors.def_propertyanddef_property_staticfor read/write properties with C++ accessors.def_readonlyanddef_readonly_staticfor read-only access to C++ data members.def_readwriteanddef_readwrite_staticfor read/write access to C++ data members.
See the pybind11 document of Instance and static fields for more information.
Named and Keyword Arguments#
pybind11 allows named arguments. In the above example, we already take the
advantage for wrapping the constructor of Grid`:
.def
(
    py::init
    (
        [](real_type xmin, real_type xmax, size_t nelm)
        {
            return Grid::construct(xmin, xmax, nelm);
        }
    )
  , py::arg("xmin"), py::arg("xmax"), py::arg("nelm")
)
It has been shown how the named arguments are used in Python:
>>> grid = libst.Grid(xmin=0, xmax=8, nelm=4*64)
See the pybind11 document of Keyword arguments for more information.
pybind11::arg also allows default value to the arguments (keyword
arguments). The wrapper code of the class Solver has an example:
.def
(
    "selms"
  , [](wrapped_type & self, bool odd_plane)
    { return elm_iter_type(self.shared_from_this(), odd_plane, 0, true); }
  , py::arg("odd_plane")=false
)
Before seeing how it is used, we run some setup code:
grid = libst.Grid(0, 4*2*np.pi, 4*64)
cfl = 1
dx = (grid.xmax - grid.xmin) / grid.ncelm
dt = dx * cfl
svr = libst.LinearScalarSolver(grid=grid, time_increment=dt)
The argument odd_plane can be accepted in multiple forms. This uses the default value:
>>> print(svr.selms())
SolverElementIterator(selm, on_even_plane, current=0, nelem=257)
Pass the argument as positional:
>>> print(svr.selms(False))
SolverElementIterator(selm, on_even_plane, current=0, nelem=257)
>>> print(svr.selms(True))
SolverElementIterator(selm, on_odd_plane, current=0, nelem=256)
Pass the argument as keyword:
>>> print(svr.selms(odd_plane=False))
SolverElementIterator(selm, on_even_plane, current=0, nelem=257)
>>> print(svr.selms(odd_plane=True))
SolverElementIterator(selm, on_odd_plane, current=0, nelem=256)
See the pybind11 document of Default arguments for more information.
What Happens in Python Stays in Python (or pybind11)#
When wrapping from C++ to Python, there are constructs only available in the scripting language but not the low-level implementation. When it happens, write the adapting code in the pybind11 layer and do not pollute the low-level implementation.
One example is the Python iterator protocol. To adapt the C++ iterator to Python, an adapting class is created in the Python wrapping layer, along with other code that calls pybind11 API, and above the low-level C++ library in “turgon”.
// The whole class is defined along with other code that calls pybind11 API
// and includes Python.h.
template< typename ST >
class SolverElementIterator
{

public:

    using solver_type = ST;

    SolverElementIterator() = delete;
    SolverElementIterator
    (
        std::shared_ptr<ST> sol
      , bool odd_plane
      , size_t starting
      , bool selm
    )
      : m_solver(std::move(sol))
      , m_odd_plane(odd_plane)
      , m_current(starting)
      , m_selm(selm)
    {}

    typename ST::celm_type next_celm()
    {
        size_t ncelm = m_solver->grid().ncelm();
        if (m_odd_plane) { --ncelm; }
        // Use pybind11 API:
        if (m_current >= ncelm) { throw pybind11::stop_iteration(); }
        typename ST::celm_type ret = m_solver->celm(m_current, m_odd_plane);
        ++m_current;
        return ret;
    }

    typename ST::selm_type next_selm()
    {
        size_t nselm = m_solver->grid().nselm();
        if (m_odd_plane) { --nselm; }
        // Use pybind11 API:
        if (m_current >= nselm) { throw pybind11::stop_iteration(); }
        typename ST::selm_type ret = m_solver->selm(m_current, m_odd_plane);
        ++m_current;
        return ret;
    }

    bool is_selm() const { return m_selm; }
    bool on_odd_plane() const { return m_odd_plane; }
    size_t current() const { return m_current; }
    size_t nelem() const
    {
        size_t ret = is_selm() ? m_solver->grid().nselm() : m_solver->grid().ncelm();
        if (m_odd_plane) { --ret; }
        return ret;
    }

private:

    std::shared_ptr<solver_type> m_solver;
    bool m_odd_plane;
    size_t m_current = 0;
    bool m_selm = false;

}; /* end class SolverElementIterator */
The wrapping code is:
using elm_iter_type = SolverElementIterator<wrapped_type>;
std::string elm_pyname = std::string(pyname) + "ElementIterator";
pybind11::class_< elm_iter_type >(*mod, elm_pyname.c_str())
    .def("__str__", &detail::to_str<elm_iter_type>)
    .def("__iter__", [](elm_iter_type & self){ return self; })
    .def(
        "__next__"
      , [](elm_iter_type & self)
        {
            py::object ret;
            if (self.is_selm()) { ret = py::cast(self.next_selm()); }
            else                { ret = py::cast(self.next_celm()); }
            return ret;
        }
    )
;
Here we use a concrete solver of linear wave (governing equation is \(u_t + u_x = 0\)) to demonstrate how it works in Python:
import numpy as np
from matplotlib import pyplot as plt

# Import the extension module that is written in C++
import libst

# Build the one-dimensional uniform grid and the corresponding solver
grid = libst.Grid(0, 4*2*np.pi, 4*64)
cfl = 1
dx = (grid.xmax - grid.xmin) / grid.ncelm
dt = dx * cfl
svr = libst.LinearScalarSolver(grid=grid, time_increment=dt)

# Initialize
# NOTE: 'selms' returns a template instance of SolverElementIterator
for e in svr.selms(odd_plane=False):
    if e.xctr < 2*np.pi or e.xctr > 2*2*np.pi:
        v = 0
        dv = 0
    else:
        v = np.sin(e.xctr)
        dv = np.cos(e.xctr)
    e.set_so0(0, v)
    e.set_so1(0, dv)

# Set up plotting
plt.figure(figsize=(15,10))
plt.xlim((0, 8))
plt.xlabel('$x$ $(\pi)$')
plt.ylabel('$u$')
plt.grid()

# Plot the initial condition
plt.plot(svr.xctr() / np.pi, svr.get_so0(0).ndarray, '-')
The code shows the initial condition of the linear wave:
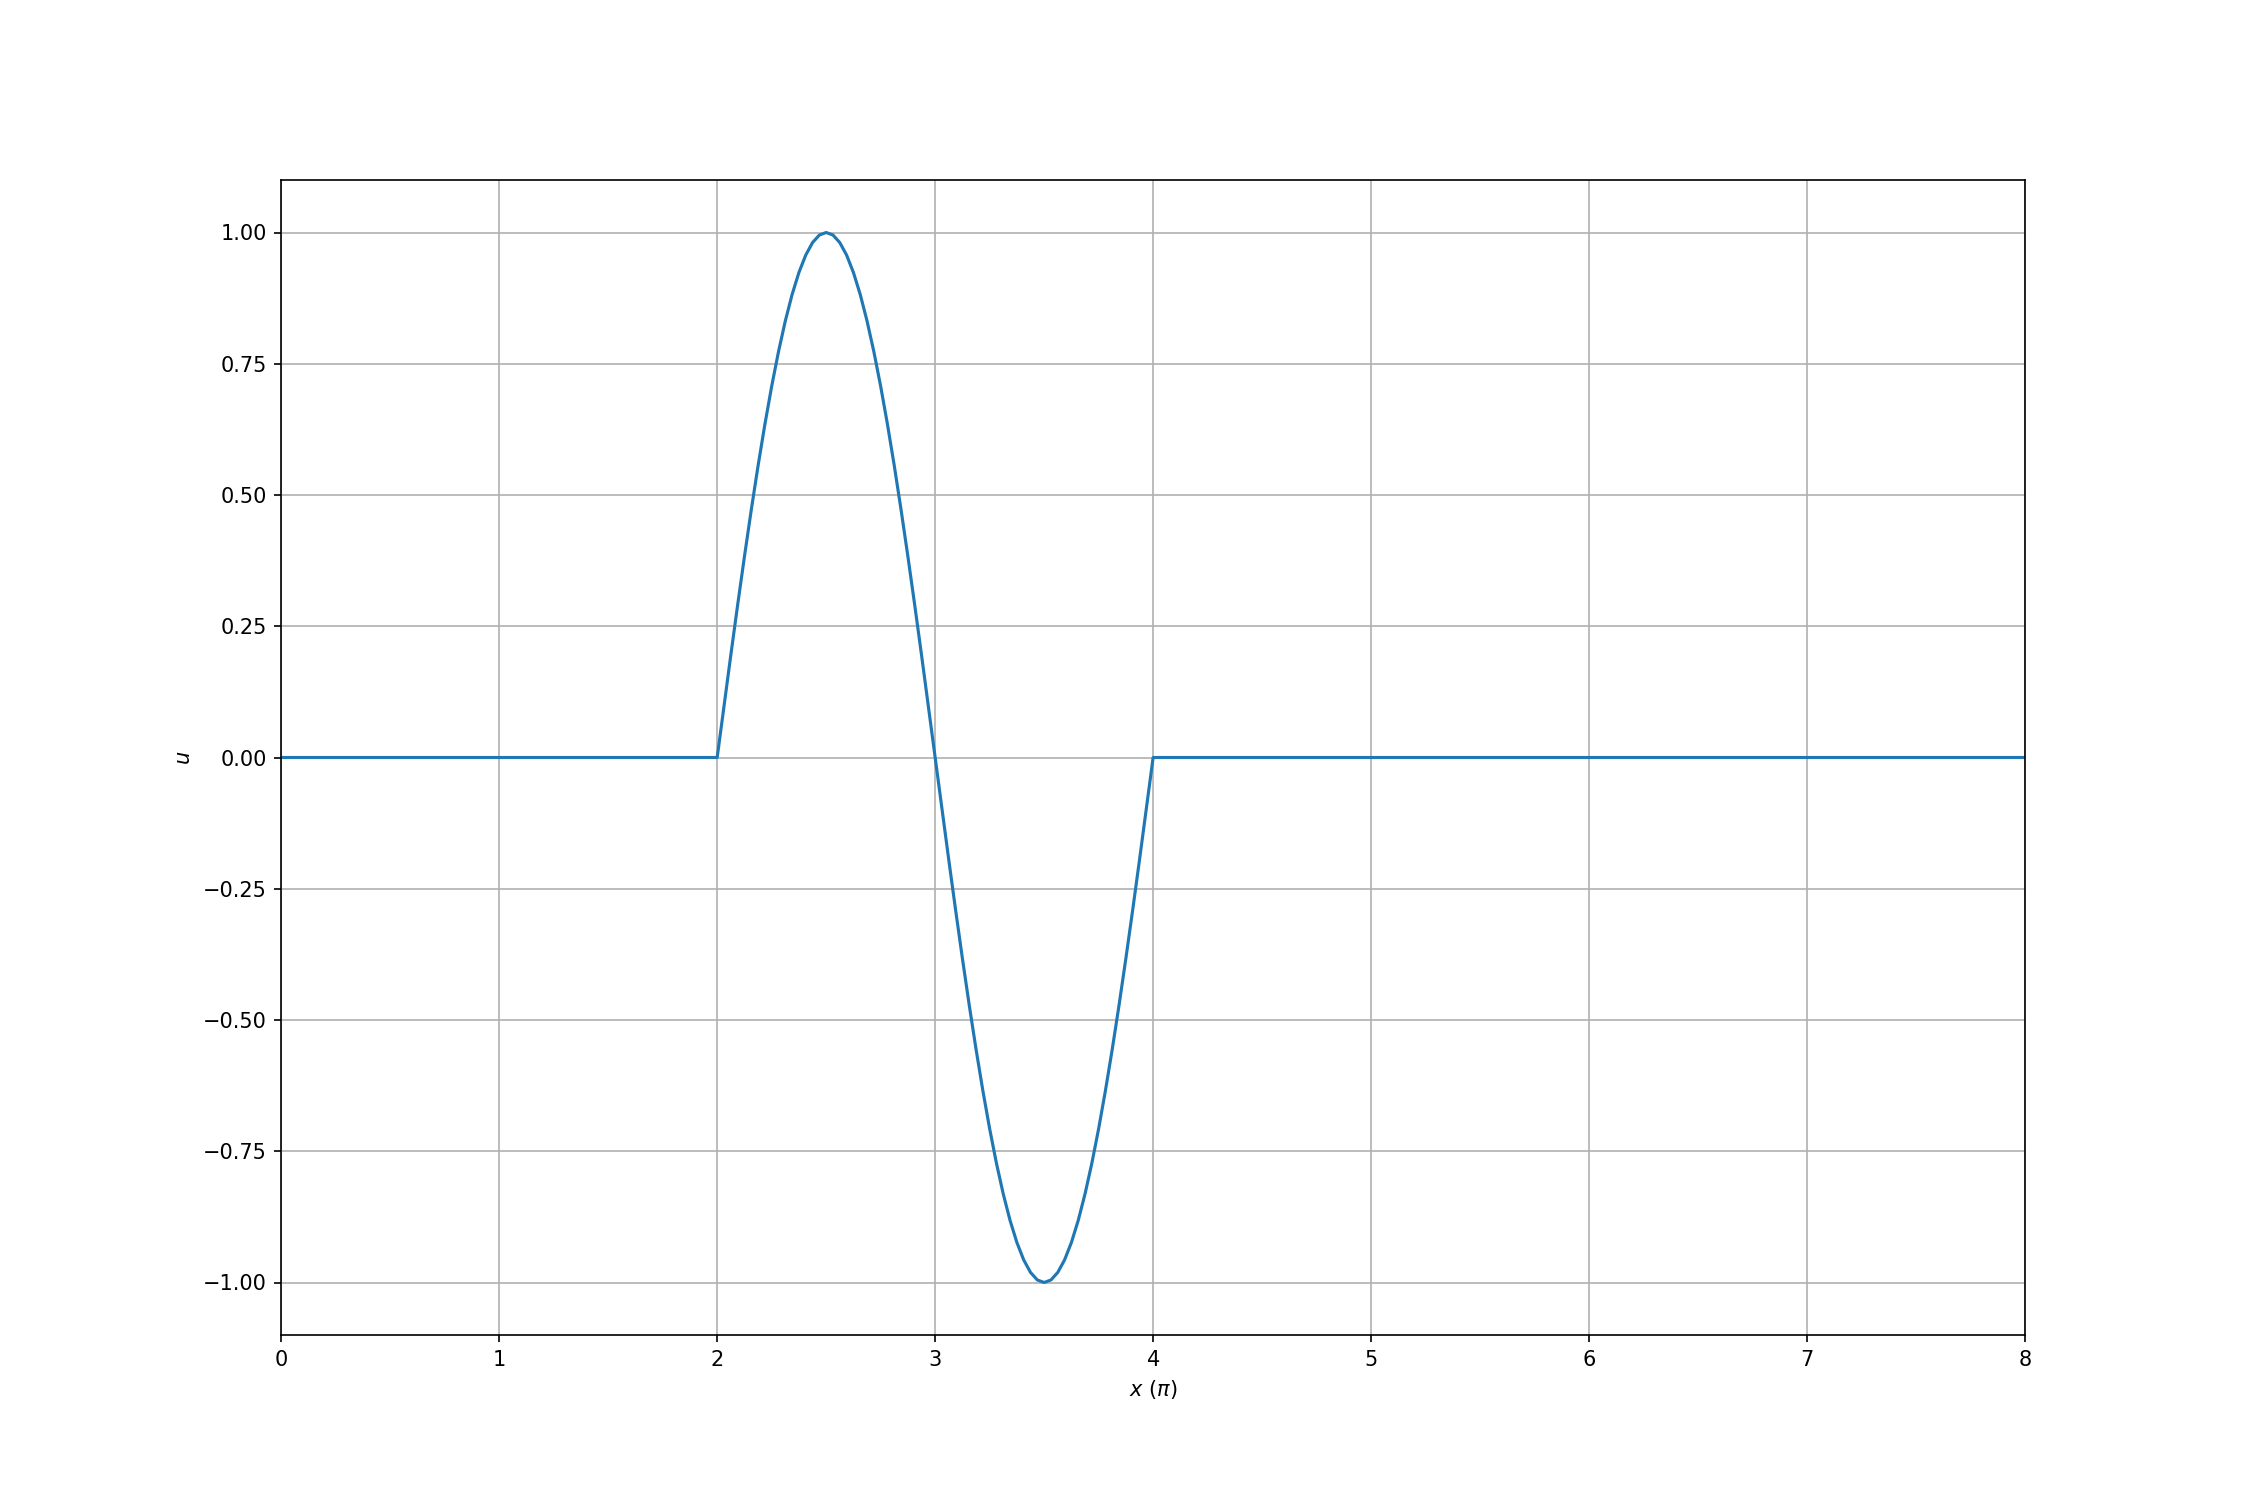
The full example code is in 04_iter.py (which is the part of 01_linear.py that skips the final time marching).
pybind11 Operating API#
pybind11 does not only provide API to wrap between C++ and Python, but also
C++ API for operating the Python interpreter and the some Python containers:
tuple, list, and dict.
See the document of Python types and the unit tests
for more information.
Python Objects in C++#
pybind11 provides C++ API for manipulating Python object (the C struct
PyObject) using the generic object protocol, so that we don’t need to dig into the Python C API and
worry about the reference counting by hand.
The first example is to create a None object from C++:
#include "pybind11/pybind11.h"

PYBIND11_MODULE(code_none, m)
{
    namespace py = pybind11;

    m
        .def
        (
            "create_none", []() { return py::none(); }
        )
    ;
}
The results:
>>> print(type(create_none()))
<class 'NoneType'>
>>> assert None is create_none()
>>> print(create_none())
None
pybind11::object is the C++ counterpart of the C
struct PyObject, and it does reference counting for us. The
following example shows how to use pybind11::object to hold a None object:
#include "pybind11/pybind11.h"

PYBIND11_MODULE(code_object, m)
{
    namespace py = pybind11;

    m
        .def
        (
            "return_none"
          , []()
            {
                py::object ret = py::none();
                return ret;
            }
        )
    ;
}
The result:
>>> print(return_none, return_none())
<built-in method return_none of PyCapsule object at 0x1111b4300> None
pybind11 allows to use pybind11::object::attr() to assign attribute to a Python object:
#include "pybind11/pybind11.h"

PYBIND11_MODULE(code_attr, m)
{
    namespace py = pybind11;

    m.attr("string_name") = "string_content";
}
The result:
>>> print(type(string_name), string_name)
<class 'str'> string_content
Import Module Using pybind11#
pybind11 provides a helper, pybind::module::import(), to import Python module and access attributes of
every Python object, including a Python module:
#include "pybind11/pybind11.h"

PYBIND11_MODULE(code1, m)
{
    namespace py = pybind11;

    m
        .def
        (
            "return_numpy_version"
          , []()
            {
                py::object numpy = py::module::import("numpy");
                return numpy.attr("__version__");
            }
        )
    ;

    m.attr("alias_to_return_numpy_version") = m.attr("return_numpy_version");
}
The results in the Python side are:
>>> print(return_numpy_version())
1.17.0.dev0+3c3ba10
>>> import numpy as np
>>> print(np.__version__)
1.17.0.dev0+3c3ba10
>>> assert np.__version__ is return_numpy_version()
>>> print(return_numpy_version)
<built-in method return_numpy_version of PyCapsule object at 0x1111b4060>
>>> print(alias_to_return_numpy_version)
<built-in method return_numpy_version of PyCapsule object at 0x1111b4060>
pybind11 for tuple#
To support Python tuple, pybind11 provides the C++ class
pybind11::tuple. Since tuple is immutable, its
creation should use pybind11::make_tuple():
#include "pybind11/pybind11.h"

PYBIND11_MODULE(code_tuple, m)
{
    namespace py = pybind11;

    py::tuple my_tuple = py::make_tuple("string_data_in_tuple", 10, 3.1415926);

    m.attr("my_tuple") = my_tuple;
}
The results in the Python side are:
>>> print(type(my_tuple), my_tuple)
<class 'tuple'> ('string_data_in_tuple', 10, 3.1415926)
pybind11 for list#
To support Python list, pybind11 provides the C++ class
pybind11::list. It is mutable and the function
pybind11::list::append() can be used for populating the container in
the C++ side:
#include "pybind11/pybind11.h"

PYBIND11_MODULE(code2, m)
{
    namespace py = pybind11;

    py::list my_list = py::list();

    my_list.append("string_data_in_list");
    my_list.append(11);
    my_list.append(2.71828);

    py::list my_list2 = py::make_tuple("string_data_in_list2", 12);

    m.attr("my_list") = my_list;
    m.attr("my_list2") = my_list2;
}
The results in the Python side are:
>>> print(type(my_list), my_list)
<class 'list'> ['string_data_in_list', 11, 2.71828]

>>> print(type(my_list2), my_list2)
<class 'list'> ['string_data_in_list2', 12]
pybind11 for dict#
To support Python dict, pybind11 provides the C++ class
pybind11::dict. The example in the C++ side:
#include "pybind11/pybind11.h"

PYBIND11_MODULE(code2, m)
{
    namespace py = pybind11;

    py::dict my_dict;

    my_dict["key_string"] = "string_data_in_dict";
    my_dict["key_int"] = 13;
    my_dict["key_real"] = 1.414;

    m.attr("my_dict") = my_dict;
}
The results in the Python side are:
>>> print(type(my_dict), my_dict)
<class 'dict'> {'key_string': 'string_data_in_dict', 'key_int': 13, 'key_real': 1.414}
CPython API with pybind11#
It is possible to use Python C API along with pybind11 and we will see how to do it. Please keep in mind that the examples here omit a lot of error checking code that is necessary for a system to run correctly. Consult the manual (Python/C API reference manual) when you need to use the C API.
When importing pybind11/pybind11.h, we don’t need to import Python.h,
because the former does it for us. But please note that
pybind11/pybind11.h or Python.h should be included before every other
inclusion. The example code in the C++ side is:
#include "pybind11/pybind11.h"
#include "Python.h" // Unnecessary

using namespace pybind11;

PYBIND11_MODULE(ex_long, m)
{
    PyObject * v = PyLong_FromLong(2000000);
    m.attr("integer_value") = v;
    Py_DECREF(v);
}
The results in the Python side are:
>>> print(type(integer_value), integer_value)
<class 'int'> 2000000
Reference Counting#
The Python C API is more convenient for inspecting or debugging the
PyObject reference counting than the pybind11 class
pybind11::object that handles the reference
count automatically:
#include "pybind11/pybind11.h"

using namespace pybind11;

static PyObject * s;

PYBIND11_MODULE(ex_str, m)
{
    s = PyUnicode_FromString("string_from_c");
    m.attr("string_value") = s;
    Py_DECREF(s);
    m
        .def
        (
            "show_ref_count_with_handle"
          , [](handle const & h)
            {
                return Py_REFCNT(h.ptr());
            }
        )
        .def
        (
            "show_ref_count_with_object"
          , [](object const & o)
            {
                return Py_REFCNT(o.ptr());
            }
        )
        .def
        (
            "show_string_value_ref_count"
          , [&]()
            {
                return Py_REFCNT(s);
            }
        )
    ;
}
The test code in the Python side is:
def check_string_value():
    print(type(string_value), string_value)
    print('before aliasing')
    print(show_ref_count_with_object(string_value), 'refcnt by object')
    print(show_ref_count_with_handle(string_value), 'refcnt by handle')
    print(sys.getrefcount(string_value), 'refcnt by sys')
    print(show_string_value_ref_count(), 'refcnt from c++')
    string_value_aliasing = string_value
    print('after aliasing')
    print(show_ref_count_with_object(string_value), 'refcnt by object')
    print(show_ref_count_with_handle(string_value), 'refcnt by handle')
    print(sys.getrefcount(string_value), 'refcnt by sys')
    print(show_string_value_ref_count(), 'refcnt from c++')
Check the results:
>>> check_string_value()
<class 'str'> string_from_c
before aliasing
7 refcnt by object
6 refcnt by handle
5 refcnt by sys
4 refcnt from c++
after aliasing
8 refcnt by object
7 refcnt by handle
6 refcnt by sys
5 refcnt from c++
pybind11 also offers two low-level short-hands for reference counting:
handle::inc_ref() and handle::dec_ref().
If we don’t want to go so low-level, it provides function templates
reinterpret_borrow() and
reinterpret_steal().
Cached Value#
Python caches small (-5 to 256) integers (see the code). Don’t get surprised when you see a large reference count for some of them integers:
>>> print('ref counts of 0:', sys.getrefcount(0))
ref counts of 0: 10198
>>> print('ref counts of 257:', sys.getrefcount(257))
ref counts of 257: 3
Real number doesn’t have that cache:
>>> print(sys.getrefcount(0.0))
3
Python interns strings consisting of alphanumerical and underscore characters.
>>> print('' is '')
True
>>> print(sys.getrefcount(''))
5552
More examples for the string interning:
def check_string_intern():
    s1 = 'numerical'
    print(sys.getrefcount('numerical'))
    print(s1 is 'numerical')
    s2 = 'num' + 'erical'
    print(s1 is s2)
    print(sys.getrefcount('numerical'))
The results are:
>>> check_string_intern()
4
True
True
5
Attribute Access#
The Python object protocol defines a set of API
for accessing object attributes. Here is a simple example that sets and gets
an attribute of an object using the PyObject_SetAttr() and
PyObject_GetAttr() API:
int PyObject_SetAttr(PyObject *o, PyObject *attr_name, PyObject *v);
PyObject* PyObject_GetAttr(PyObject *o, PyObject *attr_name);
Use pybind11 to write test code for the two API:
#include "pybind11/pybind11.h"

using namespace pybind11;

void attach_attr(PyObject * o, PyObject * name, PyObject * attr)
{
    /*int ret =*/
    PyObject_SetAttr(o, name, attr);
}

PyObject * retrieve_attr(PyObject * o, PyObject * name)
{
    PyObject * ret = PyObject_GetAttr(o, name);
    return ret;
}

PYBIND11_MODULE(ex_attr, m)
{
    m
        .def
        (
            "attach_attr"
          , [](object & o, object & name, object & attr)
            {
                attach_attr(o.ptr(), name.ptr(), attr.ptr());
            }
        )
        .def
        (
            "retrieve_attr"
          , [](object & o, object & name)
            {
                handle(retrieve_attr(o.ptr(), name.ptr()));
            }
        )
    ;
}
Use a Python sample class:
class Cls():
    pass
First, build the test objects and show the reference count:
>>> obj = Cls()
>>> val = 'attached value'
>>> print(sys.getrefcount(val))
3
Second, attach val to obj and print the reference count:
>>> attach_attr(obj, 'name', val)
>>> print(sys.getrefcount(val))
4
Check the identity of the attached object (as name):
>>> print(obj.name is val)
True
>>> print(sys.getrefcount(val))
4
Test the C++ retrieval code:
>>> val2 = retrieve_attr(obj, 'name')
>>> print(sys.getrefcount(val))
5
There are shorthand versions of the API that takes C string for the attribute
name: PyObject_SetAttrString() and
PyObject_GetAttrString(). The example code is:
#include "pybind11/pybind11.h"

#include <string>

using namespace pybind11;

void attach_attr(PyObject * o, char const * name, PyObject * attr)
{
    /*int ret =*/
    PyObject_SetAttrString(o, name, attr);
}

PyObject * retrieve_attr(PyObject * o, char const * name)
{
    PyObject * ret = PyObject_GetAttrString(o, name);
    return ret;
}

PYBIND11_MODULE(ex_attr_by_string, m)
{
    m
        .def
        (
            "attach_attr_by_string"
          , [](object & o, object & name, object & attr)
            {
                std::string name_str = cast<std::string>(name);
                attach_attr(o.ptr(), name_str.c_str(), attr.ptr());
            }
        )
        .def
        (
            "retrieve_attr_by_string"
          , [](object & o, object & name)
            {
                std::string name_str = cast<std::string>(name);
                handle(retrieve_attr(o.ptr(), name_str.c_str()));
            }
        )
    ;
}
Test again and the results are the same. First, build the test objects and show the reference count:
>>> obj = Cls()
>>> val = 'attached value'
>>> print(sys.getrefcount(val))
3
Second, attach val to obj and print the reference count:
>>> attach_attr_by_string(obj, 'name', val)
>>> print(sys.getrefcount(val))
4
Check the identity of the attached object (as name):
>>> print(obj.name is val)
True
>>> print(sys.getrefcount(val))
4
Test the C++ retrieval code:
>>> val2 = retrieve_attr_by_string(obj, 'name')
>>> print(sys.getrefcount(val))
5
Function Call#
Python C API allows to make Python function call from C. The follow C++ code
takes a Python callable and use PyObject_Call():
#include "pybind11/pybind11.h"

#include <string>

using namespace pybind11;

PyObject * function_call(PyObject * callable, PyObject * args, PyObject * kw)
{
    PyObject * ret = PyObject_Call(callable, args, kw);
    return ret;
}

PYBIND11_MODULE(ex_call, m)
{
    m
        .def
        (
            "function_call"
          , [](object & o, tuple & t, dict & kw)
            {
                return handle(function_call(o.ptr(), t.ptr(), kw.ptr()));
            }
        )
    ;
}
Use the example Python function:
def my_func(arg1, kw1='default'):
    return 'results: {}, {}'.format(arg1, kw1)
See the results by calling using only positional arguments:
>>> print('(direct call)  ', my_func('first argument'))
(direct call)   results: first argument, default
>>> print('(function_call)', function_call(my_func, ('first argument',), {}))
(function_call) results: first argument, default
See the results by calling using both positional and keyword arguments:
>>> print('(direct call)  ', my_func('first argument', kw1='non default'))
(direct call)   results: first argument, non default
>>> print('(function_call)', function_call(my_func, ('first argument',),
...       {'kw1': 'non default'}))
(function_call) results: first argument, non default
Import#
The Python C API for import a Python module is
PyImport_ImportModule(). The C++ test code:
#include "pybind11/pybind11.h"

#include <string>

using namespace pybind11;

PyObject * get_modules()
{
    PyObject * sysmod = PyImport_ImportModule("sys");
    PyObject * modules = PyObject_GetAttrString(sysmod, "modules");
    Py_DECREF(sysmod);
    return modules;
}

PYBIND11_MODULE(ex_import, m)
{
    m
        .def
        (
            "get_modules"
          , []()
            {
                PyObject * ret = get_modules();
                return handle(ret);
            }
        )
    ;
}
The results in the Python side are:
>>> modules = get_modules();
>>> print(type(modules), len(modules))
<class 'dict'> 1146
Python C API for tuple#
Here we use a simple C++ example to show how to create and operate
tuple using the following Python C API in the tuple
protocol:
PyTuple_New()createsPyTupleObjectPyTuple_GetItem()retrieves an element fromPyTupleObjectPyTuple_SetItem()sets an element toPyTupleObject
The example code returns a new tuple that has the order
reversed:
#include "pybind11/pybind11.h"

#include <string>

using namespace pybind11;

PyObject * reverse_tuple(PyObject * tup)
{
    PyObject * ret = PyTuple_New(PyTuple_Size(tup));

    for (Py_ssize_t i = 0 ; i < PyTuple_Size(tup) ; ++i)
    {
        PyObject * item = PyTuple_GetItem(tup, i);
        Py_INCREF(item);
        PyTuple_SetItem(ret, i, item); // This only works when 1 == Py_REFCNT(ret)
    }

    return ret;
}

PYBIND11_MODULE(ex_tuple, m)
{
    m
        .def
        (
            "reverse_tuple"
          , [](tuple & t)
            {
                return handle(reverse_tuple(t.ptr()));
            }
        )
    ;
}
The results in the Python side are:
>>> tv0 = "value0"
>>> tv1 = object()
>>> tup = (tv0, tv1)
>>> print(sys.getrefcount(tv1))
3
>>> rtup = reverse_tuple(tup)
>>> print(sys.getrefcount(tv1))
4
Note
It is interesting to read the code implementing
PyTuple_SetItem() for tuple that is
immutable.
Python C API for list#
Here we use a simple C++ example to show how to create and operate
list using the following Python C API in the list
protocol:
PyList_New()createsPyListObjectPyList_Append()appends an element inPyListObject
It also shows the some C API of the iterator protocol:
PyObject_GetIter()obtains a Python iteratorPyIter_Next()obtains the next element from a Python iterator
The following C++ example code iterates through each element of the input
list and return a shallow copy of that list:
#include "pybind11/pybind11.h"

using namespace pybind11;

PyObject * make_list_from_iterator(PyObject * o)
{
    PyObject * iter = PyObject_GetIter(o);
    PyObject * ret = PyList_New(0);
    PyObject * item = nullptr;
    while (nullptr != (item = PyIter_Next(iter)))
    {
        PyList_Append(ret, item);
        Py_DECREF(item);
    }
    Py_DECREF(iter);
    return ret;
}

PYBIND11_MODULE(ex_list, m)
{
    m
        .def
        (
            "make_list_from_iterator"
          , [](object & o)
            {
                PyObject * ret = make_list_from_iterator(o.ptr());
                return handle(ret);
            }
        )
    ;
}
The results in the Python side are:
>>> v0 = 'first value'
>>> v1 = 'second value'
>>> tup = (v0, v1)
>>> print(sys.getrefcount(v1))
4
>>> lst = make_list_from_iterator(tup)
>>> print(sys.getrefcount(v1))
5
>>> print(lst)
['first value', 'second value']
Python C API for dict#
Here we use a simple C++ example to show how to create and operate
dict using the following Python C API in the dict
protocol:
PyDict_New()createsPyDictObjectPyDict_SetItem()appends an element inPyDictObject
The C++ example code create a dict and provides an alternate
function for adding a key-value pair in it:
#include "pybind11/pybind11.h"

using namespace pybind11;

PyObject * make_dict()
{
    PyObject * ret = PyDict_New();
    return ret;
}

void add_dict_item(PyObject * d, PyObject * k, PyObject * v)
{
    /*int ret =*/
    PyDict_SetItem(d, k, v);
}

PYBIND11_MODULE(ex_dict, m)
{
    m
        .def
        (
            "make_dict"
          , []()
            {
                return handle(make_dict());
            }
        )
        .def
        (
            "add_dict_item"
          , [](dict & d, object & k, object & v)
            {
                add_dict_item(d.ptr(), k.ptr(), v.ptr());
            }
        )
    ;
}
The results in the Python side are:
>>> d0 = {}
>>> d1 = make_dict()
>>> print(d0 is d1)
False
>>> print(d0 == d1)
True
>>> d0['k1'] = 'value1'
>>> print(d0)
{'k1': 'value1'}
>>> add_dict_item(d1, 'k1', 'value1')
>>> print(d1)
{'k1': 'value1'}
>>> print(d0 == d1)
True
Exception#
Here is a simple example for using Python exceptions from C++ (see also Exceptions and Exception Handling):
#include "pybind11/pybind11.h"

using namespace pybind11;

PyObject * function_with_exception(PyObject * o)
{
    // Normal processing code.
    PyObject * ret = nullptr;
    PyObject * item = nullptr;
    PyObject * iter = PyObject_GetIter(o);
    if (nullptr == iter) { goto error; }
    ret = PyList_New(0);
    if (nullptr == ret) { goto error; }
    while (nullptr != (item = PyIter_Next(iter)))
    {
        int status = PyList_Append(ret, item);
        Py_DECREF(item);
        if (0 != status) { goto error; }
    }
    Py_DECREF(iter);

    // Exception.
    PyErr_SetString(PyExc_RuntimeError, "intentional exception");

error: // A good use of goto: clean up.
    Py_XDECREF(iter);
    Py_XDECREF(ret);
    return nullptr;
}

PYBIND11_MODULE(ex_except, m)
{
    m
        .def
        (
            "function_with_exception"
          , [](object & o)
            {
                PyObject * ret = function_with_exception(o.ptr());
                if (nullptr == ret) { throw error_already_set(); }
                return handle(ret);
            }
        )
    ;
}
The exception-free results in the Python side are:
>>> try:
>>>     function_with_exception(1)
>>> except TypeError as e:
>>>     print(e)
>>> else:
>>>     print('error not raised')
'int' object is not iterable
The exception results in the Python side are:
>>> try:
>>>     function_with_exception(('first value', 'second value'))
>>> except RuntimeError as e:
>>>     print(e)
>>> else:
>>>     print('error not raised')
intentional exception
Python Memory Management#
Python has its own memory manager. When writing Python extension, they should
be used for PyObject. The memory managing system has three levels:
Raw memory interface: wrapper to the C standard memory managers. It allows distinct addressed returned when requesting 0 byte. GIL is not involved.
Normal memory interface: ‘pymalloc’ with small memory optimization. GIL is required when calling.
Object memory interface: allocate for
PyObject. GIL is required when calling.
The public API are:
void * PyMem_RawMalloc(size_t size);
void * PyMem_RawCalloc(size_t nelem, size_t elsize);
void * PyMem_RawRealloc(void *ptr, size_t new_size);
void   PyMem_RawFree(void *ptr);

void * PyMem_Malloc(size_t size);
void * PyMem_Calloc(size_t nelem, size_t elsize);
void * PyMem_Realloc(void *ptr, size_t new_size);
void   PyMem_Free(void *ptr);

void * PyObject_Malloc(size_t size);
void * PyObject_Calloc(size_t nelem, size_t elsize);
void * PyObject_Realloc(void *ptr, size_t new_size);
void   PyObject_Free(void *ptr);
In [Include/cpython/pymem.h](https://github.com/python/cpython/blob/v3.8.0/Include/cpython/pymem.h#L53), Python provides a struct and a set of API to switch to custom memory managers:
typedef struct {
    /* user context passed as the first argument to the 4 functions */
    void *ctx;

    /* allocate a memory block */
    void* (*malloc) (void *ctx, size_t size);

    /* allocate a memory block initialized by zeros */
    void* (*calloc) (void *ctx, size_t nelem, size_t elsize);

    /* allocate or resize a memory block */
    void* (*realloc) (void *ctx, void *ptr, size_t new_size);

    /* release a memory block */
    void (*free) (void *ctx, void *ptr);
} PyMemAllocatorEx;

/* Get the memory block allocator of the specified domain. */
PyAPI_FUNC(void) PyMem_GetAllocator(PyMemAllocatorDomain domain,
                                    PyMemAllocatorEx *allocator);

/* Set the memory block allocator of the specified domain.

   The new allocator must return a distinct non-NULL pointer when requesting
   zero bytes.

   For the PYMEM_DOMAIN_RAW domain, the allocator must be thread-safe: the GIL
   is not held when the allocator is called.

   If the new allocator is not a hook (don't call the previous allocator), the
   PyMem_SetupDebugHooks() function must be called to reinstall the debug hooks
   on top on the new allocator. */
PyAPI_FUNC(void) PyMem_SetAllocator(PyMemAllocatorDomain domain,
                                    PyMemAllocatorEx *allocator);
See the official documentation Customize Memory Allocators. The public API is wrappers to the functions populated in the struct, e.g.:
void *
PyMem_RawMalloc(size_t size)
{
    /*
     * Limit ourselves to PY_SSIZE_T_MAX bytes to prevent security holes.
     * Most python internals blindly use a signed Py_ssize_t to track
     * things without checking for overflows or negatives.
     * As size_t is unsigned, checking for size < 0 is not required.
     */
    if (size > (size_t)PY_SSIZE_T_MAX)
        return NULL;
    return _PyMem_Raw.malloc(_PyMem_Raw.ctx, size);
}
Also see the code.
Small Memory Optimization#
Take a look at the documentation in the code. This is the ‘pymalloc’, and it uses 256 KB for allocation not greater than 512 bytes.
Tracemalloc#
Tracemalloc is a standard library that uses the custom memory manager to profile and debug Python memory use: tracemalloc — Trace memory allocations. We can follow the implementation to create more specific analysis.
Exercises#
Use pybind11 to expose a memory buffer to Python as a numpy ndarray.