Fundamental Engineering#
While there are so many things to do with engineering, the central idea is automation. Automation is to accomplish work not by human beings, but by machines. The concept becomes recursive when we make software. The software is what engineers make to automate some work. But the making itself still can be automated. It is the fundamental of software engineering.
In this chapter, we will cover the basic practices in software engineering, starting with the fundamental automation tools: Bash Scripting, Makefile, and CMake. On top of the automation, we should use version control to regulate our editing of the source code. It will be covered in Git Version Control System. Version control is a prerequisite for more advanced automation for testing the software, which is covered in Automatic Testing and Continuous Integration. The last part in this chapter is what we cannot automate: Code Review and Timing.
Bash Scripting#
Shell script is the most common way for automation. A shell is responsible for
taking commands from users. Every operating system provides shells. Because
of the ubiquitous Linux, bash becomes the most popular shell. A bash shell
script should work on almost all modern computer systems.
A shell script file contains commands to bash. Executing the bash script
file is almost the same as typing those commands directly in an interactive
shell. Running a bash shell script is like to record the commands in a file
and execute them one by one.
Structure#
A bash script is simple, but still a computer program. It will be good to organize the code in a maintainable form. So we need some structure. Let us use a simple bash script to show what is the most basic structure. It clones the CPython repository and has 4 parts:
Shebang
#!/bin/bashComment/document
#
# This script clones the cpython repository.
#
Setup
# setup environment variables.
root=${ROOT:-~/tmp}
pkgname=python
pkgbranch=${VERSION:-3.7}
pkgfull=$pkgname-$pkgbranch
pkgrepo=https://github.com/python/cpython.git
Action
# clone.
mkdir -p $root
cd $root
echo `pwd`
if [ ! -d $pkgfull ] ; then
  git clone -q -b $pkgbranch $pkgrepo $pkgfull
fi
Note
Do not over-engineer a shell script when you do not need to maintain it. It is not uncommon for us to write a run-once script.
Variables#
Variables are essential in programming languages. Variables in bash do not have types, but there are two kinds of variables distinguished by their scopes. One is the shell variable, which lives in the current shell. The other is the environment variable, which is also visible in child processes.
shell_var="shell_value"

env_var="env_value"
export env_var
export env_var2="other_env_value"
Bash provides many tricks to help us write scripts. For example, we can use
the syntax of ${NAME:-default value} to return the default value when
the variable isn’t set:
$ unset THISVAR
$ echo ${THISVAR}  # prints an empty line

$ echo ${THISVAR:-no such thing}  # variable is not set
no such thing
$ THISVAR="some value"
$ echo ${THISVAR:-no such thing}  # variable is set
some value
Sub-Process vs Source#
A bash script may be run in two ways. One is to run it like an ordinary
program. A new process will be created by the current shell, and the script
will be run in that process. The other way is to use source (or its
POSIX-compatible synonym, .) to run it in the current shell. The latter
makes the shell script work like a replay of the command sequence in it.
Assume we have a bash script called dosomething.sh:
#!/bin/bash
export MYENVVAR="MYENVVAR is set to what I want"
echo "do something"
When running the script in a sub-process, the variable MYENVVAR isn’t set
in the calling shell:
$ unset MYENVVAR
$ ./dosomething.sh
do something
$ echo ${MYENVVAR:-"MYENVVAR is not set"}
MYENVVAR is not set
When sourcing the script in the current shell, the variable MYENVVAR gets
set:
$ unset MYENVVAR
$ source ./dosomething.sh
do something
$ echo ${MYENVVAR:-"MYENVVAR is not set"}
MYENVVAR is set to what I want
Redirection#
When executing a command in a bash script it’s commonplace to redirect the output to a file or another command.
$ echo "a line output" > line.log
$ cat line.log
a line output
Sometimes we want to redirect both stdout and stderr to a file. The idiom is:
$ echo "a line output" > line.log 2>&1
$ cat line.log
a line output
Note that 2>&1 should be written after > line.log.
$ cp nothisfile.txt another.txt 2>&1 > /dev/null
cp: nothisfile.txt: No such file or directory
$ cp nothisfile.txt another.txt > /dev/null 2>&1
$ cat another.txt
cat: another.txt: No such file or directory
You may redirect only the standard error to null device. It is often used to capture the stdout result to a variable.
$ # without redirecting stderr we see unwanted messages
$ var=$(grep impossiblestring *)
grep: bind1: Is a directory
grep: build: Is a directory
grep: gtest: Is a directory
grep: make1: Is a directory
grep: make2: Is a directory
grep: make3: Is a directory
grep: make4: Is a directory
grep: nsd: Is a directory
grep: repo1: Is a directory
$ echo $var
$ # throw stderr to null device and we get only the wanted information
$ var=$(grep impossiblestring * 2> /dev/null)
$ echo $var
Branching#
To write smart scripts we need the if-else branching construct. The
following example detects the OS and runs different commands to obtain the
number of (logical) processors on the machine:
#!/bin/bash
if [[ "$(uname)" == "Darwin" ]] ; then
  NP=${NP:-$(sysctl -n hw.ncpu)}
elif [[ "$(uname)" == "Linux" ]] ; then
  NP=${NP:-$(cat /proc/cpuinfo | grep processor | wc -l)}
else
  NP=${NP:=1}
fi
echo "NP may be set to $NP"
$ uname
Darwin
$ ./shownp.sh
NP may be set to 8
Function#
bash allows us to write functions to collect commands and rerun it over and
over in a script.
#!/bin/bash
runcmd () {
  echo "run command: ${@:2}"
  { time "${@:2}" ; } > $1 2>&1
  echo "done; log file: $(cd "$(dirname $1)" && pwd)/$1"
}
runcmd line1.log echo "first command"
runcmd line2.log echo "second command"
$ ./bashfunction.sh
run command: echo first command
done; log file: /Users/yungyuc/hack/code/nsd/notebook/20au_nctu/02_engineering/line1.log
run command: echo second command
done; log file: /Users/yungyuc/hack/code/nsd/notebook/20au_nctu/02_engineering/line2.log
$ cat line1.log
first command

real  0m0.000s
user  0m0.000s
sys   0m0.000s
$ cat line2.log
second command

real  0m0.000s
user  0m0.000s
sys   0m0.000s
Makefile#
Makefile is the input file of a tool called make. make has many
derived implementations since its creation in 1976 at Bell Labs. The most
popular implementation is GNU make, which is also required in building the
Linux kernel. We will be focusing on GNU make.
A Makefile consists of rules in the following format:
target : prerequisites [...]
        recipe (1)
        recipe (2)
        ...
Note a tab is required at the beginning of each recipe line. And rules and
recipes are line-based. If a recipe should use a single line and no more, or
it needs to use \ for line continuation. So is the rule.
Note
The example code is in Example Code for Makefile.
make: Automating Your Recipes#
make keeps track of the file timestamps.
If the source file is older than its object file,
makeknows that it doesn’t need to invoke the compiler.If, in the other way around, the source file is newer than its object file, or the executable is newer than the object and library file,
makewill run the building tools according to the recipes written in theMakefile.
Note
Make originated with a visit from Steve Johnson (author of yacc, etc.), storming into my office, cursing the Fates that had caused him to waste a morning debugging a correct program (bug had been fixed, file hadn’t been compiled, cc *.o was therefore unaffected). As I had spent a part of the previous evening coping with the same disaster on a project I was working on, the idea of a tool to solve it came up. It began with an elaborate idea of a dependency analyzer, boiled down to something much simpler, and turned into Make that weekend. Use of tools that were still wet was part of the culture. Makefiles were text files, not magically encoded binaries, because that was the Unix ethos: printable, debuggable, understandable stuff.
– Stuart Feldman
Makefile Format#
Use the simple hello world program as an example for writing a make file.
First we set a variable CXX to designate the compiler command to be used:
CXX = g++
Write the first rule for linking the executable. The first rule is the default
rule that make will use when it is invoked without a target.
hello: hello.o hellomain.o
        $(CXX) hello.o hellomain.o -o hello
Then write two rules for the object files. First hello.o:
hello.o: hello.cpp hello.hpp
        $(CXX) -c hello.cpp -o hello.o
Second hellomain.o:
hellomain.o: hellomain.cpp hello.hpp
        $(CXX) -c hellomain.cpp -o hellomain.o
Now we can use a single command to run all the recipes for building hello:
$ rm -f hello *.o
$ make
g++ -c hello.cpp -o hello.o
g++ -c hellomain.cpp -o hellomain.o
g++ hello.o hellomain.o -o hello
make the second time. Nothing needs to be done:
$ make
make: `hello' is up to date.
If we change one of the source files (say, hello.cpp), make knows from
the prerequisites (dependencies) that the other one doesn’t need to be rebuilt.
$ touch hello.cpp
$ make
g++ -c hello.cpp -o hello.o
g++ hello.o hellomain.o -o hello
Change the shared prerequisites (the header file hello.hpp). Everything
needs to be rebuilt:
$ touch hello.hpp
$ make
g++ -c hello.cpp -o hello.o
g++ -c hellomain.cpp -o hellomain.o
g++ hello.o hellomain.o -o hello
Automatic Variables#
We found some duplicated file names in the recipes in the above example.
make provides automatic variables that allow us to remove them.
$@is the file name of the target of the rule.$^is the file names of all the prerequisites.$<is the file name of the first prerequisite.
Aided by the automatic variables, we can simplify the recipes:
hello: hello.o hellomain.o
        $(CXX) $^ -o $@

hello.o: hello.cpp hello.hpp
        $(CXX) -c $< -o $@

hellomain.o: hellomain.cpp hello.hpp
        $(CXX) -c $< -o $@
The new Makefile works exactly the same as the previous one, but doesn’t
have the duplicated file names.
$ rm -f hello *.o
$ make
g++ -c hello.cpp -o hello.o
g++ -c hellomain.cpp -o hellomain.o
g++ hello.o hellomain.o -o hello
Implicit Rule#
Even with the automatic variable, we see duplicated recipes for the two object
file targets. It can be removed by rewriting the implicit rule for .o
file:
%.o: %.cpp hello.hpp
        $(CXX) -c $< -o $@
% in the target will match any non-empty characters, and it is expanded in
the prerequisite. Thus, the Makefile will become much simpler. And there
are fewer places for mistakes:
CXX = g++

hello: hello.o hellomain.o
        $(CXX) $^ -o $@

%.o: %.cpp hello.hpp
        $(CXX) -c $< -o $@
$ rm -f hello *.o
$ make
g++ -c hello.cpp -o hello.o
g++ -c hellomain.cpp -o hellomain.o
g++ hello.o hellomain.o -o hello
Popular Phony Targets#
It is handy to have some targets that are not files, and use them to accomplish
some pre-defined operations. For example, almost all practical Makefiles
has a target called clean, and it removes all the built files.
$ make clean
rm -rf hello *.o
These targets are called phony targets (not real files). The above operation is accomplished by the following rule:
.PHONY: clean
clean:
        rm -rf hello *.o
Another common use of phony targets is to redirect the default rule:
# If the following two lines are commented out, the default target becomes hello.o.
.PHONY: default
default: hello

# Implicit rules will be skipped when searching for default.
#%.o: %.cpp hello.hpp
#        $(CXX) -c $< -o $@

hello.o: hello.cpp hello.hpp
        $(CXX) -c $< -o $@

hellomain.o: hellomain.cpp hello.hpp
        $(CXX) -c $< -o $@

hello: hello.o hellomain.o
        $(CXX) $^ -o $@
$ make clean
rm -rf hello *.o
$ make
g++ -c hello.cpp -o hello.o
g++ -c hellomain.cpp -o hellomain.o
g++ hello.o hellomain.o -o hello
CMake#
CMake is more than just an automation tool. For mere automation, we usually choose to use bash or make. We want to use CMake usually for cross-platform automation. In a previous example, we have seen the handling of cross-platform execution in a bash shell script:
#!/bin/bash
if [[ "$(uname)" == "Darwin" ]] ; then
  NP=${NP:-$(sysctl -n hw.ncpu)}
elif [[ "$(uname)" == "Linux" ]] ; then
  NP=${NP:-$(cat /proc/cpuinfo | grep processor | wc -l)}
else
  NP=${NP:=1}
fi
echo "NP may be set to $NP"
As the software grows, such simple conditional statements fail to handle the complexity. It applies to both shell scripts and make files. We need a dedicated tool for orchestrating the build process. CMake is such a tool.
Although it has “make” in the name, cmake is _not_ a variant of make. It
requires its own configuration file, called CMakeLists.txt. On Linux, we
usually let cmake to generate GNU make files, and then run make to build the
software. This is a so-called two-stage building process. CMake provides many
helpers so that we may relatively easily configure the real build commands to
deal with compiler flags, library and executable file names, and third-party
libraries (dependencies).
It is easy to let cmake use a separate build directory (it’s the default behavior); the built files will be in a different directory from the source tree. In this way, a single source tree may easily produce multiple binary trees.
Since cmake is only used to deal with complex configuration, we may not use a simple example to show how it is used. Instead, high-level information about what it does will be provided.
How to Run CMake#
By default cmake expects to be run in a separate build directory. Assume the current working directory is the project root. The common way to invoke cmake for building the project is:
$ mkdir -p build/dev
$ cd build/dev
$ cmake ../.. -DCMAKE_BUILD_TYPE=Release
-- The C compiler identification is AppleClang 10.0.1.10010046
-- The CXX compiler identification is AppleClang 10.0.1.10010046
...
-- Configuring done
-- Generating done
-- Build files have been written to: /absolute/path/to/build/dev
Select C++ Standard#
We may use cmake to pick which standard the C++ compiler should use:
set(CMAKE_CXX_STANDARD 14)
set(CMAKE_CXX_STANDARD_REQUIRED ON)
Different compilers may have different options for the C++ standard. Clang and
gcc use -std=, while msvc uses /std:. The cmake variables know what to
use for each of the supported compilers. The generated make file will result
in a recipe like:
c++ -O3 -DNDEBUG -fPIC -flto -std=c++14 -o CMakeFiles/_libst.dir/src/python/libst.cpp.o -c /absolute/path/to/src/python/libst.cpp
Add a Custom Option#
CMake allows to add any custom option that is consumed from the command line.
For example, a new DEBUG_SYMBOL option can be added by the following cmake
list code:
option(DEBUG_SYMBOL "add debug information" ON)

if(DEBUG_SYMBOL)
    set(CMAKE_CXX_FLAGS "${CMAKE_CXX_FLAGS} -g")
endif()
The option is supplied to cmake as such:
cmake root -DDEBUG_SYMBOL=ON
Git Version Control System#
Version control system (VCS), which is also called source control management (SCM), is essential for programmers to engineer software. There are only two things that programmers may engineer: the contents in source files, and the locations of them. VCS is to tool to track their changes.
Git (https://git-scm.com) is a popular VCS. Created in 2005, it’s a fairly young tool, while the history of VCS is at least 3 decades. There are other tools for version control, but the popularity of git makes it a right tool for most scenarios.
Github#
Github (https://github.com) is a service tightly related to git. It is a hosting service for git repositories. A repository is the basic unit for a software project that is controlled with git. Most of the time, a git-controlled project is equivalent to a git repository. Github allows you to upload repositories and share them with others. You may make the repository public (to the world) or private (accessible by only selected accounts).
Create a Repository#
The way git keeps track of the version is to store the differences into a graph. The graph is directed and acyclic, like the following diagram:
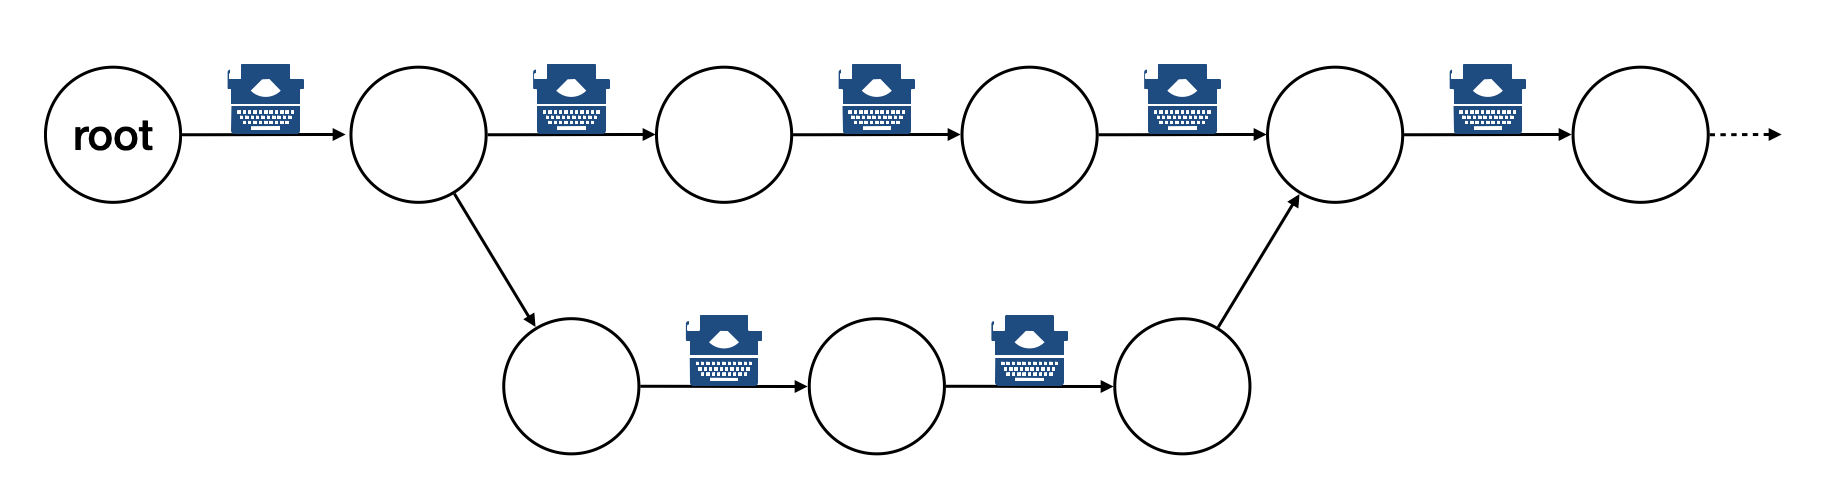
Each of the circle is called a changeset, or simply change. Each changeset stores the difference of all the files in a repository. The difference is also called diff or patch.
The first step to use git is to create the graph database, i.e., the repository.
$ rm -rf repo1 # Reset working directory.
$ # Create a brand new repository.
$ git init repo1
Initialized empty Git repository in /Users/yungyuc/hack/code/nsd/notebook/20au_nctu/02_engineering/repo1/.git/
$ # The repository is empty.
$ cd repo1
$ git log
fatal: your current branch 'master' does not have any commits yet
Add a File and Commit#
$ echo "This is a new repository" > README
$ git add README
$ git status
On branch master

No commits yet

Changes to be committed:
  (use "git rm --cached <file>..." to unstage)

  new file:   README

$ git commit -m "Initialize the repository"
[master (root-commit) e8df15c] Initialize the repository
 1 file changed, 1 insertion(+)
 create mode 100644 README
$ git log --graph --pretty=format:%x1b[31m%h%x09%x1b[32m%d%x1b[0m%x20%s
* e8df15c      (HEAD -> master) Initialize the repository
What we saved to the git repository is a changeset. A git repository is a database consist of a graph.
Add More Changes#
We may add more files to the repository. If there’s only one programmer, it’s common that our history will be a straight line.
$ cp ../make1/*.cpp ../make1/*.hpp ../make1/Makefile .
$ git add * ; git commit -m "Add code"
[master f575053] Add code
 4 files changed, 29 insertions(+)
 create mode 100644 Makefile
 create mode 100644 hello.cpp
 create mode 100644 hello.hpp
 create mode 100644 hellomain.cpp
$ cp ../make2/*.cpp ../make2/*.hpp ../make2/Makefile .
$ git add * ; git commit -m "Change code; first time"
[master 6ff5581] Change code; first time
 2 files changed, 3 insertions(+), 4 deletions(-)
$ cp ../make3/*.cpp ../make3/*.hpp ../make3/Makefile
$ git add * ; git commit -m "Change code; second time"
[master 0dcf4b9] Change code; second time
 1 file changed, 1 insertion(+), 4 deletions(-)
$ cp ../make4/*.cpp ../make4/*.hpp ../make4/Makefile repo1
$ git add * ; git commit -m "Change code; last time"
[master 46033cd] Change code; last time
 1 file changed, 17 insertions(+), 2 deletions(-)
$ # After adding more changes, show how the history looks.
$ git log --graph --pretty=format:%x1b[31m%h%x09%x1b[32m%d%x1b[0m%x20%s
* 46033cd      (HEAD -> master) Change code; last time
* 0dcf4b9      Change code; second time
* 6ff5581      Change code; first time
* f575053      Add code
* e8df15c      Initialize the repository
Show Differences#
$ git diff HEAD~1
diff --git a/Makefile b/Makefile
index 596e595..81a3d63 100644
--- a/Makefile
+++ b/Makefile
@@ -1,9 +1,24 @@
 CXX = g++

+# If the following two lines are commented out, the default target becomes hello.o.
+.PHONY: default
+default: hello
+
+# Implicit rules will be skipped when searching for default.
+#%.o: %.cpp hello.hpp
+#    $(CXX) -c $< -o $@
+
+hello.o: hello.cpp hello.hpp
+     $(CXX) -c $< -o $@
+
+hellomain.o: hellomain.cpp hello.hpp
+     $(CXX) -c $< -o $@
+
 hello: hello.o hellomain.o
  $(CXX) $^ -o $@

-%.o: %.cpp hello.hpp
-     $(CXX) -c $< -o $@
+.PHONY: clean
+clean:
+     rm -rf hello *.o

 # vim: set noet nobomb fenc=utf8 ff=unix:
$ git diff HEAD~1 HEAD~2
diff --git a/Makefile b/Makefile
index 596e595..a55350c 100644
--- a/Makefile
+++ b/Makefile
@@ -3,7 +3,10 @@ CXX = g++
 hello: hello.o hellomain.o
  $(CXX) $^ -o $@

-%.o: %.cpp hello.hpp
+hello.o: hello.cpp hello.hpp
+     $(CXX) -c $< -o $@
+
+hellomain.o: hellomain.cpp hello.hpp
  $(CXX) -c $< -o $@

 # vim: set noet nobomb fenc=utf8 ff=unix:
Clone#
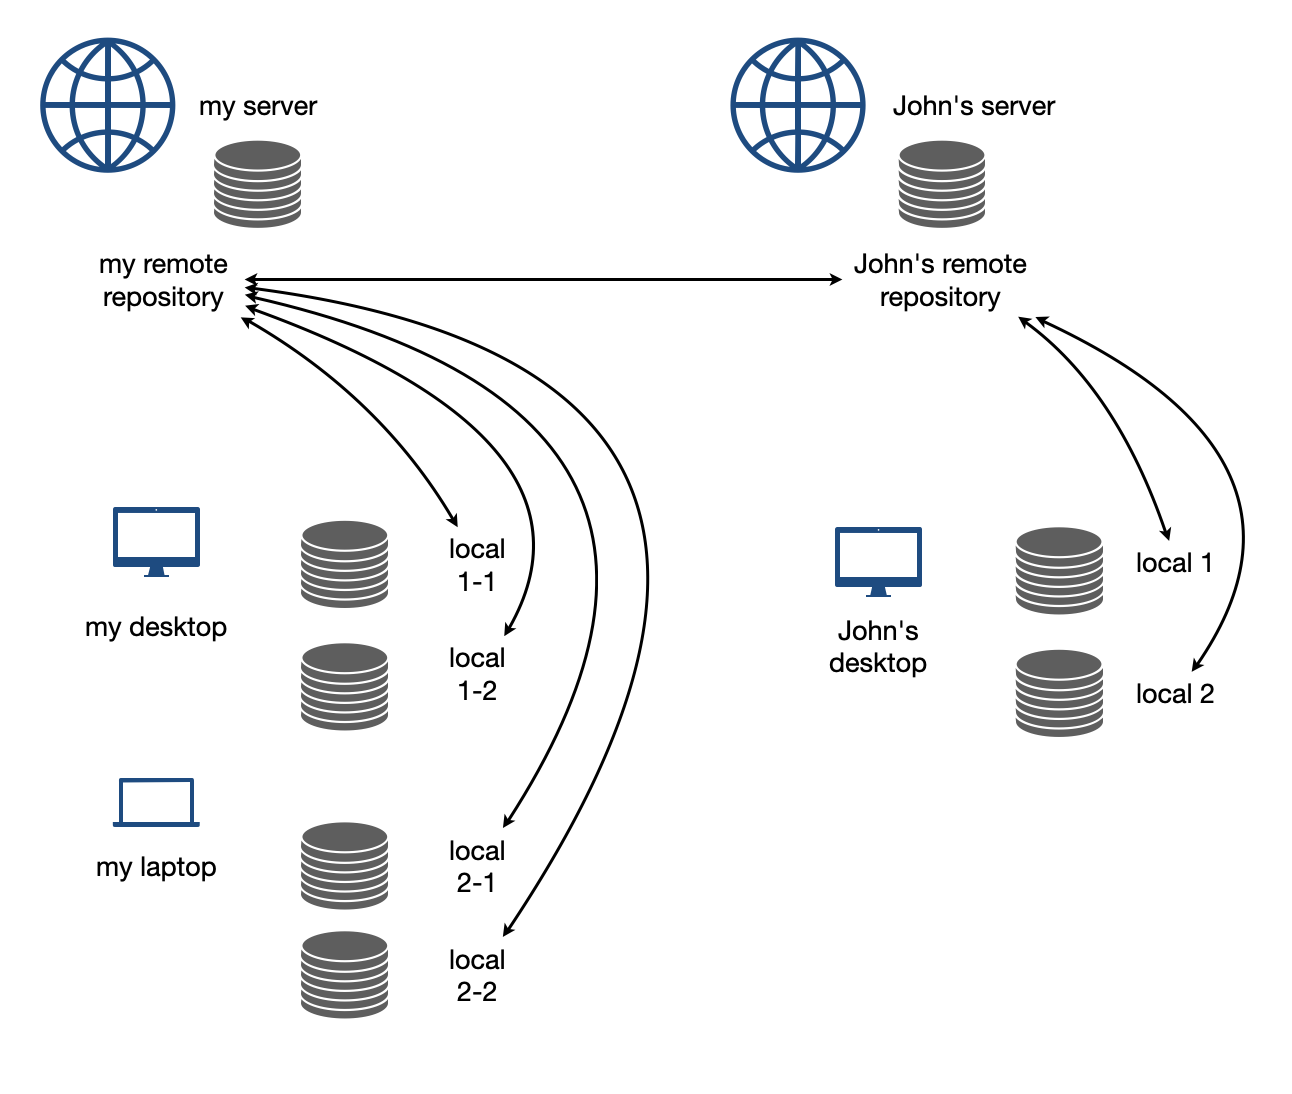
Git is a distributed VCS. It means that when we use git to track history, we don’t need to rely on a remote server. The way git does it is to make every location that needs the history to have a full copy of it. When we develop code and add patches to the repository, we don’t need to talk to a server.
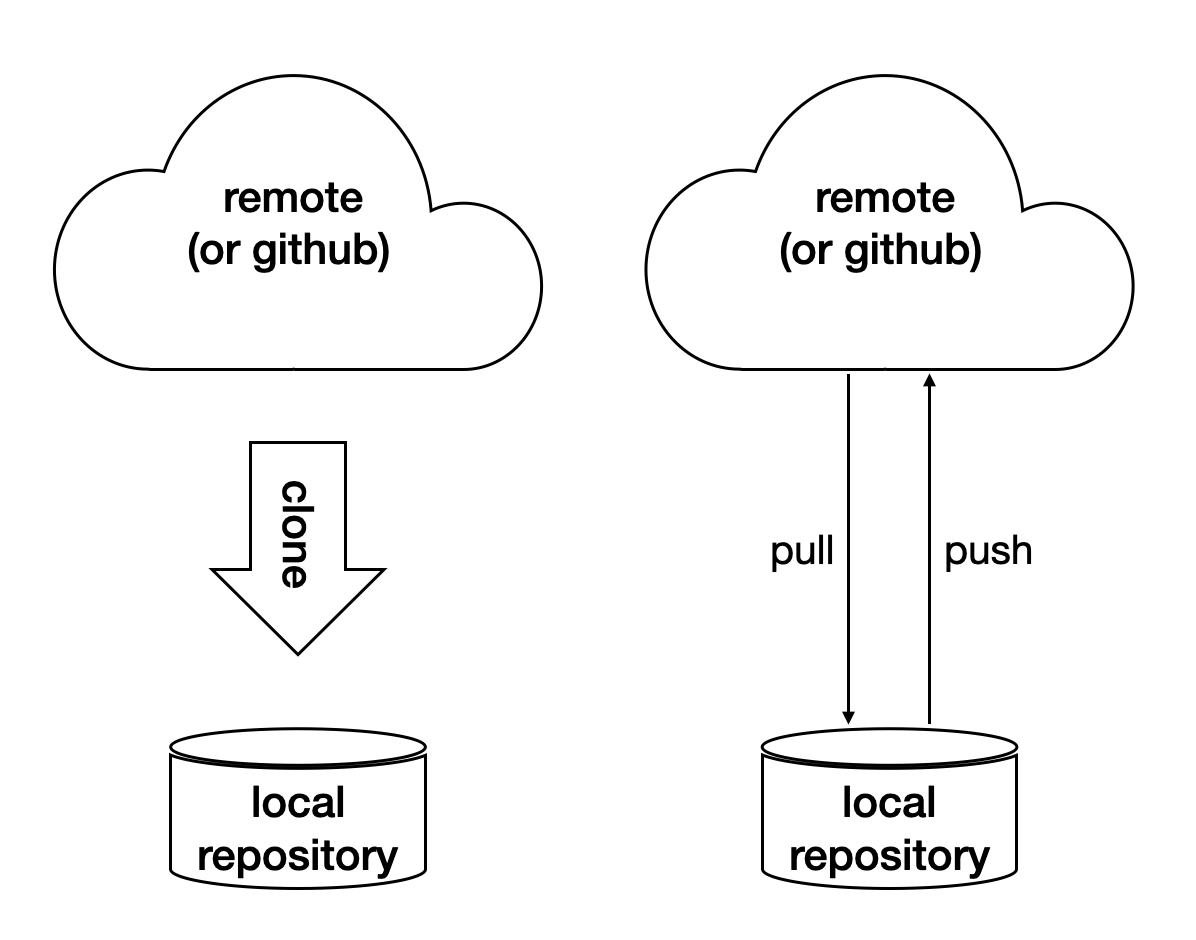
In a collaborative environment, we usually have an “origin”, or “blessed” repository. It is where we get the authentic history. Then it is _cloned_ to our workstation, where we do software development. After we make the necessary changes and check in to the (local) repository, we synchronize to the remote repository.
Try to clone a repository from github.
$ git clone git@github.com:yungyuc/nsd.git
Cloning into 'nsd'...
remote: Enumerating objects: 50, done.
remote: Counting objects: 100% (50/50), done.
remote: Compressing objects: 100% (38/38), done.
remote: Total 1987 (delta 16), reused 40 (delta 11), pack-reused 1937
Receiving objects: 100% (1987/1987), 1.93 MiB | 1.93 MiB/s, done.
Resolving deltas: 100% (1195/1195), done.
Synchronization#
The synchronization is two-way: push means to upload the local changes to the remote repository, and pull downloads changes in the remote repository to local. Git is responsible for making sure to have no duplication of changes.
Branching and Merging#

A successful Git branching model, Vincent Driessen, 2010.
In addition to branching and merging, rebase is also a critical technique for operating a git repository, but it is best to learn it by yourself when developing code in this course.
Automatic Testing#
Automatic testing is part of software development flow. When working on a project, we may first build the code:
$ mkdir -p build/dev
$ pushd build/dev
$ cmake ../.. -DCMAKE_BUILD_TYPE=Release
...
$ popd
$ make -C build/dev
...
Then make some modification:
$ vi include/spacetime.hpp
...
Rebuild:
$ make -C build/dev
...
After the building succeeds, run testing code included in the project to make sure the code we added didn’t break the system:
$ ./build/dev/gtests/libst_gtests
[==========] Running 3 tests from 2 test cases.
[----------] Global test environment set-up.
[----------] 2 tests from CopyTest
[ RUN      ] CopyTest.Grid
[       OK ] CopyTest.Grid (0 ms)
[ RUN      ] CopyTest.Solver
[       OK ] CopyTest.Solver (0 ms)
[----------] 2 tests from CopyTest (0 ms total)

[----------] 1 test from SolverTest
[ RUN      ] SolverTest.Celm
[       OK ] SolverTest.Celm (0 ms)
[----------] 1 test from SolverTest (0 ms total)

[----------] Global test environment tear-down
[==========] 3 tests from 2 test cases ran. (0 ms total)
[  PASSED  ] 3 tests.
$ env PYTHONPATH=$(pwd) pytest tests
============================= test session starts ==============================
platform darwin -- Python 3.7.3+, pytest-4.4.1, py-1.8.0, pluggy-0.9.0
rootdir: /Users/yungyuc/hack/code/turgon/spacetime
collected 51 items

tests/test_celm_selm.py .............................                    [ 56%]
tests/test_grid.py ....                                                  [ 64%]
tests/test_inviscid_burgers.py ..                                        [ 68%]
tests/test_linear_scalar.py ......                                       [ 80%]
tests/test_solution.py ..........                                        [100%]

========================== 51 passed in 0.38 seconds ===========================
The testing needs to be automatic. If they weren’t, we are introducing an unnecessary factor for human error.
Why Test#
To err is human. It’s possible to be free from mistakes for 20 lines of code, but it is unrealistic to write 1,000 lines of code and expect no error. There’s a time I changed 200 lines of code without running a compiler while typing, at the end when the compiler builds without an error I fell out of my chair.
Thus, it’s commonplace that programmers write “experimental code” during development. Numerical code is no different. Compared to other applications, numerical code tends to formulate a full problem for the experiment. If the code is for a research project, the “experiment” itself may sometimes be the purpose.
For any application, the experimental code isn’t much different from a test that will be used to check for regressions. We may run the tests every time we change the code. Thus, it’s important to make the automatic tests fast.
Sensitivity is an equivalently important point for automatic tests. We want the tests to capture regressions. But we don’t want them to fail with expected change of results and slow down the development.
Automatic testing is a simple but important tool to improve coding productivity as well as code quality.
Google Test for C++#
A test framework provides assertions, test discovery, runners, and reports. Google test is a popular test framework for C++.
#include <gtest/gtest.h>

#include "spacetime.hpp"


namespace st = spacetime;

TEST(CopyTest, Grid) {

    std::shared_ptr<st::Grid> grid=st::Grid::construct(0, 100, 100);
    st::Grid copied_grid(*grid);
    EXPECT_NE(grid.get(), &copied_grid);

}

TEST(CopyTest, Solver) {

    std::shared_ptr<st::Grid> grid=st::Grid::construct(0, 100, 100);

    std::shared_ptr<st::Solver> sol=st::Solver::construct(grid, 1, 1);
    std::shared_ptr<st::Solver> cloned_sol=sol->clone();
    EXPECT_NE(sol.get(), cloned_sol.get());
    EXPECT_EQ(&sol->grid(), &cloned_sol->grid());

    std::shared_ptr<st::Solver> cloned_grid_sol=sol->clone(true);
    EXPECT_NE(sol.get(), cloned_grid_sol.get());
    EXPECT_NE(&sol->grid(), &cloned_grid_sol->grid());

}

TEST(SolverTest, Celm) {

    std::shared_ptr<st::Grid> grid=st::Grid::construct(0, 100, 100);
    std::shared_ptr<st::Solver> sol=st::Solver::construct(grid, 1, 1);

    st::Celm ce0 = sol->celm(0, false);
    st::Celm ce99 = sol->celm(99, false);
    EXPECT_FALSE(ce0 == ce99);
    EXPECT_TRUE (ce0 != ce99);
    EXPECT_TRUE (ce0 <  ce99);
    EXPECT_TRUE (ce0 <= ce99);
    EXPECT_FALSE(ce0 >  ce99);
    EXPECT_FALSE(ce0 >= ce99);

}

int main(int argc, char **argv) {
    ::testing::InitGoogleTest(&argc, argv);
    return RUN_ALL_TESTS();
}

/* vim: set et ts=4 sw=4: */
Python Tests#
Python standard library has a unit-test framework. It serves the same purpose for Python as Google-test for C++. This sort of tests is called unit tests because they test the smallest unit of constructs in a system. Since our requirements of the automatic testing is speed and sensitivity, it usually becomes equivalent to unit tests.
import unittest

import numpy as np

import libst


class GridTC(unittest.TestCase):

    def setUp(self):

        self.grid10 = libst.Grid(xmin=0.0, xmax=10.0, nelm=10)

    def test_construction(self):

        with self.assertRaisesRegex(
            ValueError,
            "Grid::Grid\(xmin=0, xmax=10, ncelm=0\) invalid argument: "
            "ncelm smaller than 1",
        ):
            libst.Grid(0, 10, 0)

        with self.assertRaisesRegex(
            ValueError,
            "Grid::Grid\(xmin=10, xmax=10, ncelm=10\) invalid arguments: "
            "xmin >= xmax",
        ):
            libst.Grid(10, 10, 10)

        with self.assertRaisesRegex(
            ValueError,
            "Grid::Grid\(xmin=11, xmax=10, ncelm=10\) invalid arguments: "
            "xmin >= xmax",
        ):
            libst.Grid(11, 10, 10)

        # Simply test for passing.
        libst.Grid(xloc=np.arange(2) * 0.1)

        for s in [0, 1]:
            with self.assertRaisesRegex(
                ValueError,
                "Grid::init_from_array\(xloc\) invalid arguments: "
                "xloc.size\(\)=%d smaller than 2" % s
            ):
                libst.Grid(xloc=np.arange(s) * 0.1)

        with self.assertRaisesRegex(
            ValueError,
            "Grid::init_from_array\(xloc\) invalid arguments: "
            "xloc\[0\]=1 >= xloc\[1\]=0.9"
        ):
            libst.Grid(xloc=np.arange(10, -1, -1) * 0.1)

    def test_xcoord(self):

        nx = (self.grid10.ncelm + self.grid10.BOUND_COUNT)*2 + 1
        golden_x = np.arange(0.0, 10.1, 0.5)
        golden_front = golden_x[0] - golden_x[self.grid10.BOUND_COUNT:0:-1]
        golden_back = golden_x[-1] - golden_x[-2:-self.grid10.BOUND_COUNT-2:-1]
        golden_back += golden_x[-1]
        golden_x = np.hstack([golden_front, golden_x, golden_back])

        self.assertEqual(nx, len(self.grid10.xcoord))
        self.assertEqual(golden_x.tolist(), self.grid10.xcoord.tolist())
        self.grid10.xcoord.fill(10)
        self.assertEqual([10]*nx, self.grid10.xcoord.tolist())

    def test_number(self):

        self.assertEqual(10, self.grid10.ncelm)
        self.assertEqual(11, self.grid10.nselm)

    def test_str(self):

        self.assertEqual("Grid(xmin=0, xmax=10, ncelm=10)",
                         str(self.grid10))
There are many other types of testing. General software quality assurance is a bigger subject, and relate less directly to code development.
Wrap to Python: pybind11#
A numerical software system is hybrid in language. C++ is used in the low level for speed and architecture. Python or another scripting language is in the high level for easy customization. If users have the source code, they have the option to change the software at any level, but most of the time they would like to stay at the high-level scripting layer that we provide as the user interface.
The high-level scripting layer will be also useful for testing. But the first step is to make the low-level C++ available to Python. Here comes pybind11. It is a header-only library to expose C++ types in Python, and vice versa. We primarily use it for wrapping C++ to Python.
Here is an example demonstrating how pybind11 works. We rotate a vector in the 2-dimensional Cartesian coordinate system by an angle. Let \(\mathbf{v}\) be the original vector, \(\theta\) the rotation angle, and \(\mathbf{v}'\) the rotated vector. The formula for the rotation is simple:
The formula can be easily turned into any language. Since we are showing pybind11, it may be implemented in C++ and wrapped to Python, and then we can test it easily.
Continuous Integration#
Continuous integration (CI) is a practice that each developer in a team integrates the individual work into the shared mainstream regularly and frequently. Thus, the chance for the developers to step on each other’s toes is reduced.
Here is a simple example. Assume a developer, Abby, wrote the rotate function:
// vector before angle
std::tuple<double, double> rotate(std::tuple<double, double> const & vec, double rad);
But another developer, Bob, assumed another signature:
// angle before vector
std::tuple<double, double> rotate(double rad, std::tuple<double, double> const & vec);
When they merge their branches, it is obvious that their code won’t work together. Because the difference in signature, the discrepancy is likely to be detected when they try to build the merged source code.
But oftentimes, compiler cannot tell the discrepancy. It can only be detected during runtime.
// the angle is in radian
std::tuple<double, double> rotate(std::tuple<double, double> const & vec, double rad);

int main(int argc, char ** argv)
{
    std::tuple<double, double> vec = get_vector();
    double deg = get_angle();
    // the angle is in degree
    std::tuple<double, double> ret = rotate(vec, deg);
    return 0;
}
If the function assumes the angle to be in radian but the caller uses the wrong unit which is degree, we will need a test to detect the error.
CI Service#
Continuous integration (CI) is tightly coupled with a version control system. The basic feature of a CI system is to regularly run tests. It does not need to run every test with every check-in. Oftentimes it is not practical to do so. As long as the tests are run regularly, we can apply the technique of bisection:
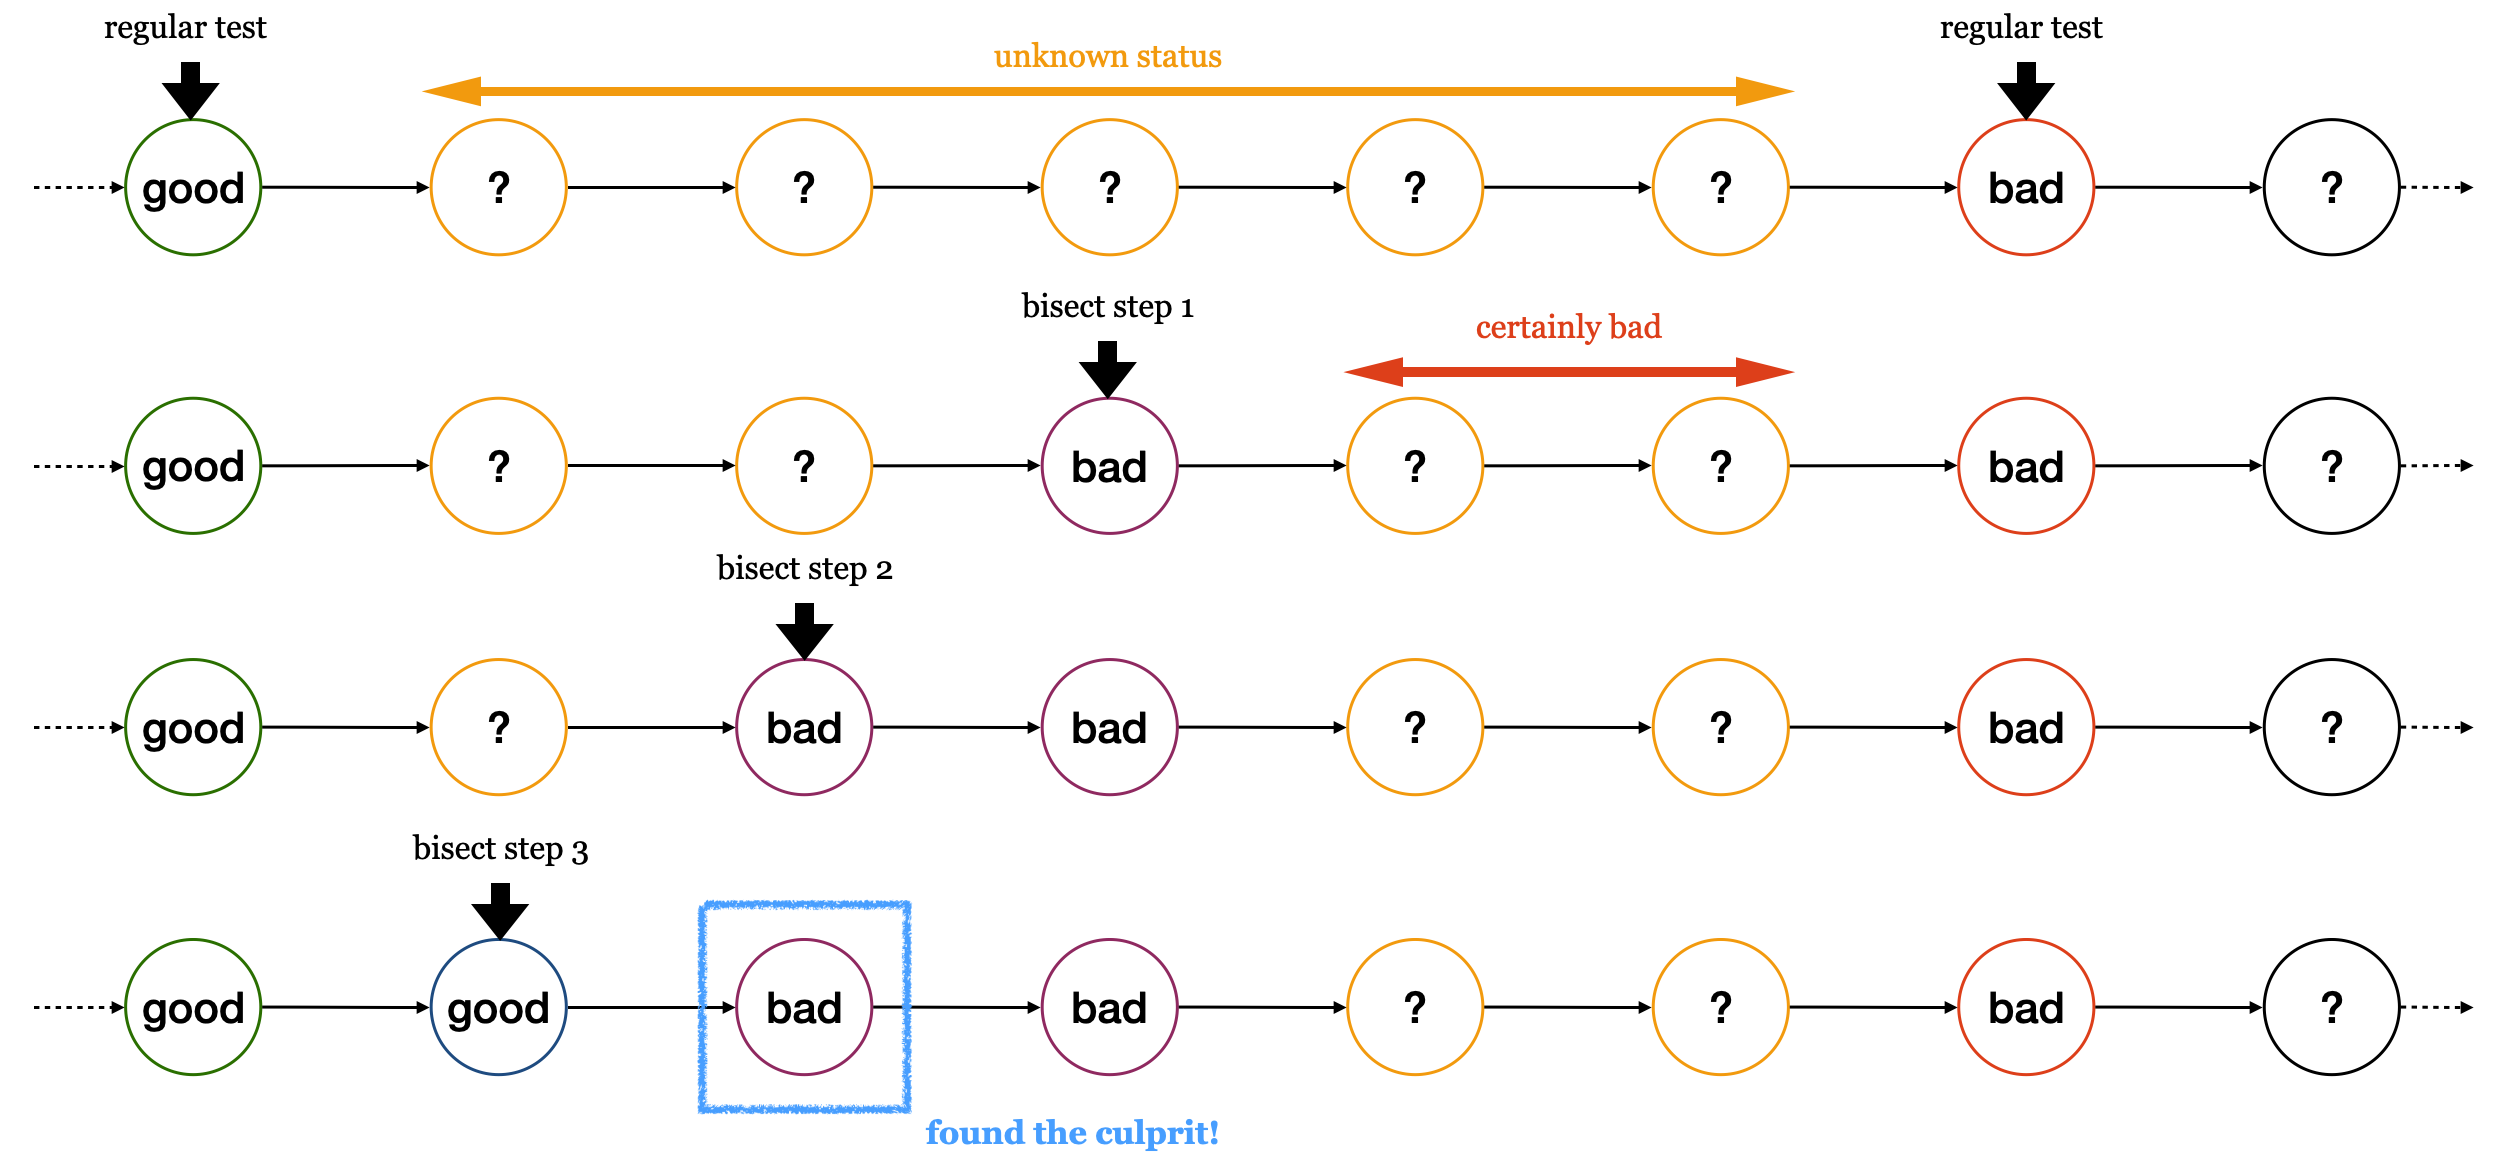
Github Action is one of such services available for public use, and fully integrated with Github.
For large-scale software development team, it is commonplace to build their in-house CI system. It may be built from scratch or by customizing a general system like Jenkins. The in-house system usually will be highly integrated to the internal infrastructure and offer features very specific to the products it serves.
Code Review#
Software development takes a lot of communication. This may be counter-intuitive to non-developers. In an ideal, entropy free world, there is no cost to transfer information between minds, and collaboration is conducted without friction in communication.
In real world, communication doesn’t work like that. To develop useful software, the goal itself must be defined first. This takes a lot of work and, intuitively, communication. But after the goal is clarified and defined, we still need to spend a lot of efforts in communication.
You may be curious why? Let’s use our vector example again:
// vector before angle by Abby
std::tuple<double, double> rotate(std::tuple<double, double> const & vec, double rad);
// angle before vector by Bob
std::tuple<double, double> rotate(double rad, std::tuple<double, double> const & vec);
Assume Abby developed her version first. If she kept that herself, nothing prevents Bob’s incompatible version from being written. But if Abby somehow told Bob her design, Bob would not create the incompatible version in the first place.
Code review is an efficient way for Abby to communicate with Bob about her change. It actually works in two way:
When Abby develops the function
rotate, she post a code review and Bob learns from her howrotateshould work.When Bob develops code that uses
rotate, he posts a code review, and Abby can comment that his version isn’t compatible to the existing implementation, and asks Bob to modify.
Here is a real-world example for how code review works: https://github.com/solvcon/devenv/pull/58.
Timing#
Measurement is the first and most important thing to do for developing high-performance code.
There are usually two “times” we measure: CPU time and wall time. The latter is also called elapsed time. To know how fast a specific code snippet runs, CPU time provides accurate measurement. It takes into account only the time when the processor is allocated to the process, and isn’t mixed with other processes or system calls.
But when measuring the performance of the overall system, for which usually everything is taken into account, we may use the wall time. The wall time is the time that elapses in the real world.
Timing Command#
In Linux, you can issue a bash command for timing: time. It reports
the time spent in the command that is passed to it:
$ time ls > /dev/null

real  0m0.003s
user  0m0.001s
sys   0m0.001s
The “real” time means the wall time. The “user” time is the CPU time spent in the executable’s code. The “system” time is the CPU time spent in the OS calls from the executable. The total CPU time is the user and system times combined.
Linux Timing Functions#
In C and C++ programs, we can use the timing functions provided by the C library. For example, the CPU time may be obtained from:
clock_t times (struct tms *buffer);
The wall time may be obtained from:
int gettimeofday (struct timeval *tp, struct timezone *tzp);
Timing is tricky for multi-threading and on an multi-process system.
Python Timing Tool#
Python has a module timeit in its standard library for timing. By default
it uses wall time.
$ python3 -m timeit '"-".join(str(n) for n in range(100))'
Exercises#
Write a bash shell script to build all of the example programs in the previous lectures.
Write a Makefile to build all of the example programs in the previous lecture.
Write a C++ function that calculates the angle (in radians) between two vectors in the 2-dimensional Cartesian coordinate system. Use pybind11 to wrap it to Python. Use Python unit-test to check the result is correct. You may use third-party test runners, e.g., py.test or nosetest.
Use the package ipybind (https://github.com/aldanor/ipybind) to enable building C++ code in Jupyter notebook. Repeat problem 3 without the unit tests, but do it in a Jupyter notebook. Test code should be included in the Jupyter notebook, but the execution can be manual.