Advanced Python#
Python is a simple language, but its base on dynamicity makes it to easily implement some magical behaviors. Although the cost at runtime is high, the magics is very convenient. Combined with the high-speed C++ and C code, the advanced Python features are powerful when used correctly.
Iterator#
When processing a big amount of data, repetition is used everywhere. The data need to be kept somewhere, and that is why we use containers. We write code to access the elements one by one. This pattern is called iteration.
Python provides the iterator protocol for this pattern. Let us see a simple. Create a list holding 10 integer elements:
>>> # Build a list of numerical data:
>>> data = [0, 1, 2, 3, 4, 5, 6, 7, 8, 9]
>>> type(data)  # Show the type: it's indeed a list.
<class 'list'>
Then iterate over all the elements in data through the for ... in ...
loop:
>>> # This uses the iterator protocol.
>>> for v in data:
...     print(v)
...
0
1
2
3
4
5
6
7
8
9
Note
Python iteration is slow. High-performance code almost never loops in Python. However it is easy to write and helpful when debugging. A high-performance system commonly provides it as a supplement for a fast but hard-to-debug API.
Custom Iterator#
The iterator protocol works closely with the for loop. A programmer can use
it to change the behavior of the loop. In the following example, we create a
class implementing the iterator protocol. It takes a sequence, and create a new
value on the fly when returning the elements.
1 2 3 4 5 6 7 8 9 10 11 12 13 14 15 16 17 18 19 20 21 22 23 24 25 26 27 28 29 30 31 32 33 34 35 | class ListIterator:
"""
This class takes an offset value for all the element in the container.
"""
def __init__(self, data, offset=0):
self.data = data # The data container.
self.it = None # The current index in the container.
self.offset = offset # The offset value.
# Return the iterator object itself.
def __iter__(self):
return self
# Return the next element from the iterator.
def __next__(self):
if None is self.it:
self.it = 0
elif self.it >= len(self.data)-1:
self.it = None
# Raise the exception if there is no more elements to be iterated.
raise StopIteration
else:
self.it += 1
return self.data[self.it] + self.offset
|
To use it, we need to create the custom iterator from the existing data list:
>>> # Iterate all elements but return (100 + v) instead of v.
>>> list_iterator = ListIterator(data, offset=100)
>>> # Print the iterator object and review the type.
>>> print(list_iterator)
<__main__.ListIterator object at 0x10cfaebd0>
Take a look at its members. Look for __iter__ and __next__.
>>> print(dir(list_iterator))
['__class__', '__delattr__', '__dict__', '__dir__', '__doc__', '__eq__',
'__format__', '__ge__', '__getattribute__', '__gt__', '__hash__', '__init__',
'__init_subclass__',
'__iter__',
'__le__', '__lt__', '__module__', '__ne__', '__new__',
'__next__',
'__reduce__', '__reduce_ex__', '__repr__', '__setattr__', '__sizeof__',
'__str__', '__subclasshook__', '__weakref__', 'data', 'it', 'offset']
Every time the construct needs the next element, ListIterator.__next__() is
called. Let us see how it runs. In the for loop iterating over
list_iterator, it does not return the value in the data list, but the
value offset by 100.
>>> # The iterator offset the value in the list.
>>> for v in list_iterator:
...     print(v)
...
100
101
102
103
104
105
106
107
108
109
If hard-coding the offset value in the loop, you can do the same thing without the custom iterator. To put it in another way, we may say, the custom iterator parameterizes the offset value.
>>> # Hard-code the offset value in the loop.
>>> for v in data:
...     print(v + 100)
...
100
101
102
103
104
105
106
107
108
109
Built-In Iterator#
Python provides a built-in iterator helper iter() so it is not
really necessary to create a custom iterator class if you do not need a very
special treatment. (The custom class ListIterator is not really special
enough to warrant a custom class. We will cover this part later.)
>>> # Create an iterator object using the built-in iter() function.
>>> list_iterator2 = iter(data)
>>> # Check the type of the built-in iterator object:
>>> print(list_iterator2)
<list_iterator object at 0x10cfb2990>
>>> # The built-in iterator works the same as directly iterating the list.
>>> for v in list_iterator2:
...     print(v)
...
0
1
2
3
4
5
6
7
8
9
Comparison
Compare with the type of our custom iterator:
>>> print(list_iterator)
<__main__.ListIterator object at 0x10cfaebd0>
Take a look at its members of the built-in iterator. Look for __iter__ and
__next__ like we did for the custom iterator.
>>> print(dir(list_iterator2))
['__class__', '__delattr__', '__dir__', '__doc__', '__eq__',
'__format__', '__ge__', '__getattribute__', '__gt__', '__hash__', '__init__',
'__init_subclass__',
'__iter__',
'__le__', '__length_hint__', '__lt__', '__ne__', '__new__',
'__next__',
'__reduce__', '__reduce_ex__', '__repr__',
'__setattr__', '__setstate__', '__sizeof__', '__str__', '__subclasshook__']
Comparison
Compare with the members of our custom iterator. The only difference is that
the custom iterator has one additional member __dict__.
>>> print(dir(list_iterator))
['__class__', '__delattr__', '__dict__', '__dir__', '__doc__', '__eq__',
'__format__', '__ge__', '__getattribute__', '__gt__', '__hash__', '__init__',
'__init_subclass__',
'__iter__',
'__le__', '__lt__', '__module__', '__ne__', '__new__',
'__next__',
'__reduce__', '__reduce_ex__', '__repr__', '__setattr__', '__sizeof__',
'__str__', '__subclasshook__', '__weakref__', 'data', 'it', 'offset']
Implicitly Created Iterator#
The built-in iterator may also be created by calling
container.__iter__() method on the container object
(iter() simply does it for you):
>>> # Create an iterator object using the iterator protocol.
>>> list_iterator3 = data.__iter__()
>>> print(list_iterator3)
<list_iterator object at 0x10cfbab90>
Aided by container.__iter__(), most of the time we can directly
use a container in the loop construct for ... in ..., because the construct
knows about the iterator protocol.
Generator#
Generator is an advanced use of the iterator protocol. It is a special way to make a function to return an iterator. It is a special iterator that is also known as a generator iterator. Let us see a simple example of the generator function.
def list_generator(input_data, offset=0):
    """
    Generator function to return the element in a sequence by adding the given
    offset value.
    """
    for v in input_data:
        # This is what makes it special.
        yield v + offset
What makes it special is the yield statement. A generator function uses the yield statement instead of the return statement. The yield statement does not return the object it takes, but a generator object that will return the object it takes.
The generator function can do the same thing as the custom iterator class
ListIterator we made previously. Let us see how it works step by step.
The first step is to call the generator function and print its return.
>>> # Call the generator function and get the return.
>>> generator = list_generator(data, offset=100)
>>> # Print the return.  See it is not the value returned by "yield".
>>> print(generator)
<generator object list_generator at 0x10cf756d0>
The object returned by the generator function list_generator() is a
generator object. The generator object is an iterator,
and has the methods iterator.__iter__() and
iterator.__next__(). (The members in line 10 – 11 are not in
the built-in iterator. But just like the additional members in our
ListIterator, these members do no harm either.)
1 2 3 4 5 6 7 8 9 10 11 | >>> print(dir(generator))
['__class__', '__del__', '__delattr__', '__dir__', '__doc__', '__eq__',
'__format__', '__ge__', '__getattribute__', '__gt__', '__hash__', '__init__',
'__init_subclass__',
'__iter__',
'__le__', '__lt__', '__name__', '__ne__', '__new__',
'__next__',
'__qualname__', '__reduce__', '__reduce_ex__', '__repr__', '__setattr__',
'__sizeof__', '__str__', '__subclasshook__',
'close', 'gi_code', 'gi_frame', 'gi_running', 'gi_yieldfrom', 'send',
'throw']
|
The second step is to put the generator in a for loop. And we will see it works in the same way as the iterators we used earlier.
>>> # Iterate over the generator iterator.
>>> for v in generator:
...     print(v)
...
100
101
102
103
104
105
106
107
108
109
List Comprehension#
By list comprehensions, we are talking about the construct:
[ ... for ... in ... ]
It is not an iterator but heavily depends on the iterator protocol.
Python borrowed the syntax of list comprehension from other languages, e.g., Haskell. List comprehensions also follow the iterator protocol. And that is why we are talking about it in this section.
The list comprehensions provide an elegant way to build a list in a one-liner.
It makes code look cleaner when used wisely. For example, the for
loop:
>>> for v in data:
...     print(v)
...
0
1
2
3
4
5
6
7
8
9
can be replaced by a one-liner:
>>> print("\n".join([str(v) for v in data]))
0
1
2
3
4
5
6
7
8
9
They make it easier to change the format of the print.
>>> print(", ".join([str(v) for v in data]))
0, 1, 2, 3, 4, 5, 6, 7, 8, 9
In the above examples, the code using the list comprehensions is more readable
than the for loop version. That is usually the guideline for choosing
between a list comprehension or a for loop: readability.
And back to our custom iterator example. The list comprehensions also provide a
nicer way to do what we did with the class ListIterator.
>>> # The single line offset list.
>>> print([v+100 for v in data])
[100, 101, 102, 103, 104, 105, 106, 107, 108, 109]
>>> # The multi-line version of the offset list.
>>> print("\n".join([str(v+100) for v in data]))
100
101
102
103
104
105
106
107
108
109
Note
While list comprehensions are mostly a short-hand to the for loop, it may
runs faster or slowers than the for loop. It depends on the complexity
of your statement and the container.
Generator Expression#
The list comprehensions pave the road for explaining what is a generator expression. The generator expression
( ... for ... in ... )
is a more convenient way to create a generator.
Note
Although a generator expression ( ... for ... in ... ) (using parentheses)
looks like a list comprehension [ ... for ... in ... ] (using brackets),
they are different things.
Take a look at its members and confirm that it also has __iter__ and
__next__.
>>> # Use the generator expression to create a generator.
>>> generator2 = (v + 100 for v in data)  # Hard-code the offset.
>>> # See the type of the object.
>>> print(generator2)
<generator object <genexpr> at 0x10cfce1d0>
See what are in the object.
>>> print(dir(generator2))
['__class__', '__del__', '__delattr__', '__dir__', '__doc__', '__eq__',
'__format__', '__ge__', '__getattribute__', '__gt__', '__hash__', '__init__',
'__init_subclass__',
'__iter__',
'__le__', '__lt__', '__name__', '__ne__', '__new__',
'__next__',
'__qualname__', '__reduce__', '__reduce_ex__', '__repr__', '__setattr__',
'__sizeof__', '__str__', '__subclasshook__',
'close', 'gi_code', 'gi_frame', 'gi_running', 'gi_yieldfrom', 'send',
'throw']
The generator iterator returned from the generator expression works just like the iterator shown before:
>>> for v in generator2:
...     print(v)
...
100
101
102
103
104
105
106
107
108
109
Because it is an expression, it can be used to replace the list comprehension in an expression. The one-liner that printed the data can have the brackets removed (turning from using a list comprehension to using a generator expression):
>>> print("\n".join(str(v + 100) for v in data))
100
101
102
103
104
105
106
107
108
109
Comparison
Compare with the list comprehension.
>>> print("\n".join( [ str(v+100) for v in data ] ))
100
101
102
103
104
105
106
107
108
109
While it is not obvious in this small test, the list-comprehension version uses
more memory than the generator-expression version, because the list
comprehension really creates a new list. The generator, on the other hand, is a
small iterator object. It makes a big difference in memory consumption when the
data object is large.
Stack Frame#
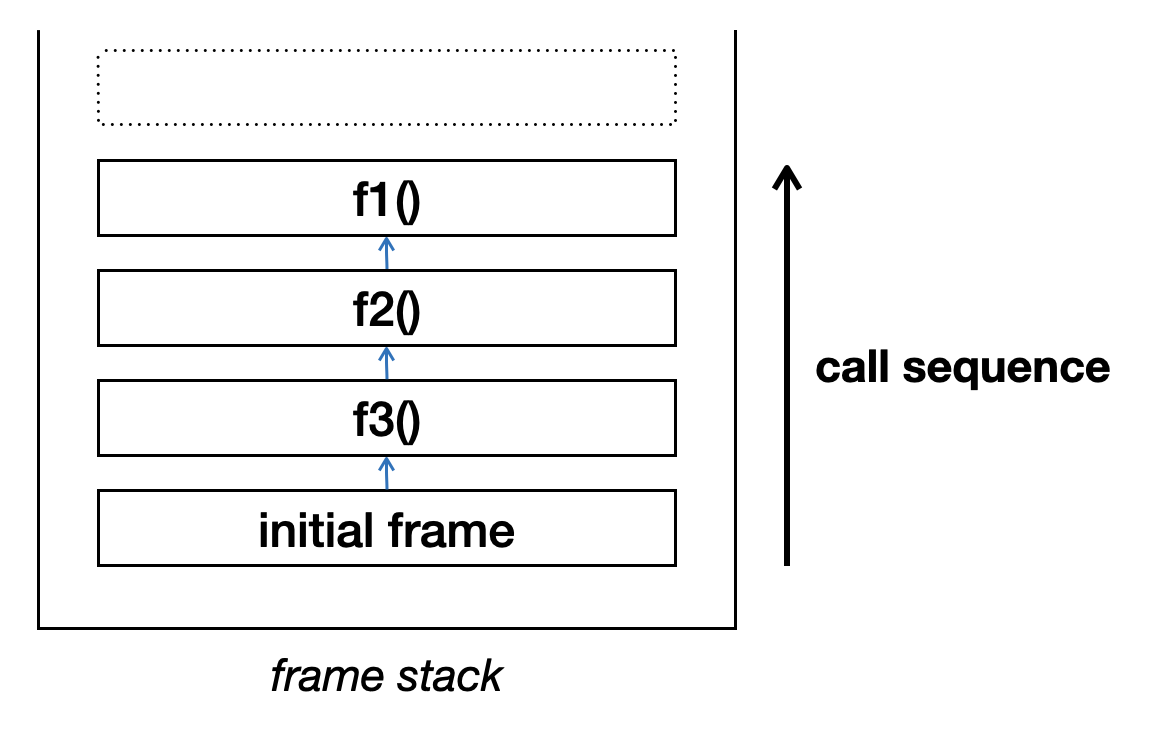
Python uses a stack-based interpreter. When calling a function, the interpreter adds a frame object on a stack, and the frame object is responsible for keeping track of the state in the execution construct. The frame is considered the implementation detail of the Python interpreter, so it is not guaranteed to always work or be backward compatible, but the implementation has been pretty stable.
Consider the following code that calls f3(), f2(), and then f1() in
chain:
1 2 3 4 5 6 7 8 9 10 | def f1():
pass
def f2():
f1()
def f3():
f2()
f3()
|
The call stack will look like:
Python provides helpers to access the frame data in traceback
and inspect.
Print the Call Stack#
The following code uses traceback to print all the previous
stack frames in f1():
showstack.py).#1 2 3 4 5 6 7 8 9 10 | import traceback
def f1():
traceback.print_stack()
def f2():
f1()
def f3():
f2()
|
Run f3():
>>> f3()
File "<stdin>", line 1, in <module>
File "<stdin>", line 2, in f3
File "<stdin>", line 2, in f2
File "<stdin>", line 2, in f1
Frame Object#
We can get the frame object of the current stack frame using
inspect.currentframe():
>>> import inspect
>>> f = inspect.currentframe()
A frame object has the following attributes, as documented in
the inspect module in the standard library. The attributes
can be put in two groups.
Namespace attributes for the data accessible from the frame:
Other information:
f_back: next outer frame object (this frame’s caller)f_code: code object being executed in this framef_lasti: index of last attempted instruction in bytecodef_lineno: current line number in Python source codef_trace: tracing function for this frame, or None
Let us see it ourselves:
>>> print([k for k in dir(f) if not k.startswith('__')])
['clear', 'f_back', 'f_builtins', 'f_code', 'f_globals', 'f_lasti',
'f_lineno', 'f_locals', 'f_trace', 'f_trace_lines', 'f_trace_opcodes']
The inspect module provides other helpers for getting frames.
For example, the function inspect.stack() allows us to obtain
all frames in the stack. The following code uses it to print the stack frames
in a custom way:
showframe.py).#1 2 3 4 5 6 7 8 9 10 11 12 | #!/usr/bin/env python3
import sys
import inspect
def main():
for it, fi in enumerate(inspect.stack()):
sys.stdout.write('frame #{}:\n line {}\n\n'.format(
it, fi.frame.f_lineno))
if __name__ == '__main__':
main()
|
$ ./showframe.py
frame #0:
line 9
frame #1:
line 12
Danger
Because a frame object holds everything a construct uses, after
finishing using the frame object, make sure to break the reference
to it:
>>> f.clear()
>>> del f
If we don’t do it, it may take long time for the interpreter to break the reference for you.
Frame Namespace#
The 3 namespaces Python provides in each frame can be explained in the following example function:
shownamespace.py).#1 2 3 4 5 6 7 8 | import inspect
module_specific = "module data"
def main():
function_local = "local data"
f = inspect.currentframe()
|
The builtins namespace holds the symbols that are available no matter what are defined in the source code. We can print it using:
print(sorted(f.f_builtins.keys()))
The result is:
['ArithmeticError', 'AssertionError', 'AttributeError', 'BaseException',
'BlockingIOError', 'BrokenPipeError', 'BufferError', 'BytesWarning',
'ChildProcessError', 'ConnectionAbortedError', 'ConnectionError',
'ConnectionRefusedError', 'ConnectionResetError', 'DeprecationWarning',
'EOFError', 'Ellipsis', 'EnvironmentError', 'Exception', 'False',
'FileExistsError', 'FileNotFoundError', 'FloatingPointError', 'FutureWarning',
'GeneratorExit', 'IOError', 'ImportError', 'ImportWarning',
'IndentationError', 'IndexError', 'InterruptedError', 'IsADirectoryError',
'KeyError', 'KeyboardInterrupt', 'LookupError', 'MemoryError',
'ModuleNotFoundError', 'NameError', 'None', 'NotADirectoryError',
'NotImplemented', 'NotImplementedError', 'OSError', 'OverflowError',
'PendingDeprecationWarning', 'PermissionError', 'ProcessLookupError',
'RecursionError', 'ReferenceError', 'ResourceWarning', 'RuntimeError',
'RuntimeWarning', 'StopAsyncIteration', 'StopIteration', 'SyntaxError',
'SyntaxWarning', 'SystemError', 'SystemExit', 'TabError', 'TimeoutError',
'True', 'TypeError', 'UnboundLocalError', 'UnicodeDecodeError',
'UnicodeEncodeError', 'UnicodeError', 'UnicodeTranslateError',
'UnicodeWarning', 'UserWarning', 'ValueError', 'Warning', 'ZeroDivisionError',
'__build_class__', '__debug__', '__doc__', '__import__', '__loader__',
'__name__', '__package__', '__spec__', 'abs', 'all', 'any', 'ascii', 'bin',
'bool', 'breakpoint', 'bytearray', 'bytes', 'callable', 'chr', 'classmethod',
'compile', 'complex', 'copyright', 'credits', 'delattr', 'dict', 'dir',
'divmod', 'enumerate', 'eval', 'exec', 'exit', 'filter', 'float', 'format',
'frozenset', 'getattr', 'globals', 'hasattr', 'hash', 'help', 'hex', 'id',
'input', 'int', 'isinstance', 'issubclass', 'iter', 'len', 'license', 'list',
'locals', 'map', 'max', 'memoryview', 'min', 'next', 'object', 'oct', 'open',
'ord', 'pow', 'print', 'property', 'quit', 'range', 'repr', 'reversed',
'round', 'set', 'setattr', 'slice', 'sorted', 'staticmethod', 'str', 'sum',
'super', 'tuple', 'type', 'vars', 'zip']
We do not need to do anything and the symbols are available (automatically “built in”).
The global namespace holds symbols defined in the module. In the above example code, there are a module, a function, and a variable defined in the “global” namespace.
1 2 3 4 5 6 7 | # Commonly imported modules are global
assert "inspect" in f.f_globals
# Commonly defined functions are global
assert "main" in f.f_globals
# The "global" variables are actually module-level
assert "module_specific" in f.f_globals
assert "module data" == f.f_globals["module_specific"]
|
Note
Python “global” variables are actually module-level global. The “really global” symbols are the builtins, which we rarely change.
The local namespace holds the symbols defined in the frame:
1 2 3 | # The local variables are in the local namespace
assert "function_local" in f.f_locals
assert "local data" == f.f_locals["function_local"]
|
Although the frame can access both the global and local variables, the namespaces are different. The locally defined symbols are not available in the global namespace, and vice versa.
1 2 3 4 5 | # Local variables are not in globals
assert "function_local" not in f.f_globals
# "Global" variables are not in local namespace
assert "module_specific" not in f.f_locals
|
The 3 namespaces are useful in many ways. We only need to get them from the
frame object when we want to access those not in the current frame. If we want
to programmatically access the namespaces in the current scope, Python provides
more convenient API: __builtins, globals, and locals().
1 2 3 4 5 6 7 8 9 | # f_builtins is exactly the __builtins__ available at the frame
assert f.f_builtins == __builtins__.__dict__
assert f.f_builtins is __builtins__.__dict__
# f_globals is exactly the globals() available at the frame
assert f.f_globals == globals()
assert f.f_globals is globals()
# f_locals is exactly the locals() available at the frame
assert f.f_locals == locals()
assert f.f_locals is locals()
|
Frame Code#
The field f_code is a mysterious code object. When studying the Python
interpreter internal, these fields are a great starting point.
>>> print(f.f_code)
<code object <module> at 0x10d0d1810, file "<ipython-input-26-dac680851f0c>",
line 3>
It contains a lot of information:
>>> print(sorted(k for k in dir(f.f_code) if not k.startswith("__")))
['co_argcount', 'co_cellvars', 'co_code', 'co_consts', 'co_filename',
'co_firstlineno', 'co_flags', 'co_freevars', 'co_kwonlyargcount', 'co_lnotab',
'co_name', 'co_names', 'co_nlocals', 'co_posonlyargcount', 'co_stacksize',
'co_varnames', 'replace']
We can find a list of the fields in the document of the module
inspect. That’s pretty much the official document of the
code object. We need to do study outselves to learn more. In the following
example code, it shows the following fields:
co_name: name with which this code object was definedco_argcount: number of arguments (not including keyword only arguments,*or**args)co_filename: name of file in which this code object was createdco_firstlineno: number of first line in Python source code
showcode.py).#1 2 3 4 5 6 7 8 9 10 11 12 13 14 15 16 | #!/usr/bin/env python3
import inspect
def main():
f = inspect.currentframe()
# Get the code object
c = f.f_code
# Show the function name and argument count
print("name and argcount:", c.co_name, c.co_argcount)
# Show file name and line number
print("filename, line number:", c.co_filename, c.co_firstlineno)
main()
|
The result is:
name and argcount: main 0
filename, line number: /Users/yungyuc/work/ynote/nsd/12advpy/code/./showcode.py 5
Module Magic with meta_path#
Python modules are also Python objects. There is API to create it from Python
(types.ModuleType) and from C
(PyModule_Type). When writing Python, we simply use:
import useful_module
to import a module and use the code written in it. It may be interesting to know that a module is also an object:
>>> isinstance(useful_module, object)
True
>>> type(useful_module)
<class 'module'>
We can print the module to show some information:
>>> print(useful_module)
<module 'useful_module' from '/path/to/useful_module.py'>
In most scenarios, that’s what we need to know about modules. But there are cases that we want to control how to import a module, which involves the creation of the module object.
Python importlib allows us to customize how modules are
imported with a high degree of freedom. Among many approaches, a convenient
facility is sys.meta_path.
Here I will use an example to show how to use sys.meta_path to
customize module loading. I will use a module, onemod, locating in an
alternate directory, altdir/, and ask Python to load it from the
non-standard location.
Note
Before running the example, make a shallow copy of the list to back it up:
>>> old_meta_path = sys.meta_path[:] # Keep the original meta path
Then later the meta path can be reset by:
>>> sys.meta_path = old_meta_path # Reset meta path to original
Meta Path#
sys.meta_path defines a list of
importlib.abc.MetaPathFinder objects for customizing the
import process. Take a look at the contents in
sys.meta_path:
>>> print(sys.meta_path)
[<class '_frozen_importlib.BuiltinImporter'>,
<class '_frozen_importlib.FrozenImporter'>,
<class '_frozen_importlib_external.PathFinder'>]
At this point, onemod cannot be imported, because the path altdir/ is
not in sys.path:
>>> import onemod
Traceback (most recent call last):
File "<stdin>", line 1, in <module>
ModuleNotFoundError: No module named 'onemod'
In normal Python code, you will be asked to modify sys.path to
include the path altdir/ for correctly import onemod. But to show how
to customize module import, we will take another approach.
Meta Path Finder#
Here we will use importlib.abc.MetaPathFinder. Derive from
the abstract base class (ABC) and override the
importlib.abc.MetaPathFinder.find_spec() method to tell it to
load the module onemod at the place we specify.
For our path finder to work, we need to properly set up a
importlib.machinery.ModuleSpec and create a
importlib.machinery.SourceFileLoader object:
1 2 3 4 5 6 7 8 9 10 11 12 13 14 | import os
import importlib.abc
import importlib.machinery
class MyMetaPathFinder(importlib.abc.MetaPathFinder):
def find_spec(self, fullname, path, target=None):
if fullname == 'onemod':
print('DEBUG: fullname: {} , path: {} , target: {}'.format(
fullname, path, target))
fpath = os.path.abspath('altdir/onemod.py')
loader = importlib.machinery.SourceFileLoader('onemod', fpath)
return importlib.machinery.ModuleSpec(fullname, loader, origin=fpath)
else:
return None
|
Add an instance of MyMetaPathFinder in sys.meta_path:
>>> sys.meta_path = old_meta_path + [MyMetaPathFinder()]
>>> print(sys.meta_path)
[<class '_frozen_importlib.BuiltinImporter'>, <class
'_frozen_importlib.FrozenImporter'>, <class
'_frozen_importlib_external.PathFinder'>, <__main__.MyMetaPathFinder object
at 0x10117b850>]
With the meta path finder inserted, onemod can be imported:
>>> import onemod
DEBUG: fullname: onemod , path: None , target: None
>>> print("show content in onemod module:", onemod.content)
show content in onemod module: string in onemod
It limits the special loading scheme to the specific module onemod. To test,
ask it to load a module that does not exist:
>>> import one_non_existing_module
Traceback (most recent call last):
File "<stdin>", line 1, in <module>
ModuleNotFoundError: No module named 'one_non_existing_module'
See the module we loaded. Compare it with a “normal module”.
>>> import re
>>> print('onemod:', onemod)
onemod: <module 'onemod' (/Users/yungyuc/work/web/ynote/nsd/12advpy/code/altdir/onemod.py)>
>>> print('re:', re)
re: <module 're' from '/Users/yungyuc/hack/usr/opt39_210210/lib/python3.9/re.py'>
The module objects have an important field __spec__, which is the
importlib.machinery.ModuleSpec we created:
>>> print('onemod.__spec__:', onemod.__spec__)
onemod.__spec__: ModuleSpec(name='onemod',
loader=<_frozen_importlib_external.SourceFileLoader object at 0x10117bd30>,
origin='/Users/yungyuc/work/web/ynote/nsd/12advpy/code/altdir/onemod.py')
>>> print('re.__spec__:', re.__spec__)
re.__spec__: ModuleSpec(name='re',
loader=<_frozen_importlib_external.SourceFileLoader object at 0x1010b4fa0>,
origin='/Users/yungyuc/hack/usr/opt39_210210/lib/python3.9/re.py')
Descriptor#
Python is very flexible in accessing attributes in an object. There are multiple ways to customize the access, and the descriptor protocol provides the most versatile API and allows us to route attribute access anywhere [1].
Naive Accessor#
To show how descriptors work, make a naive accessor class (by following the descriptor protocol):
1 2 3 4 5 6 7 8 9 10 11 | class ClsAccessor:
"""Routing access to all instance attributes to the descriptor object."""
def __init__(self, name):
self._name = name
self._val = None
def __get__(self, obj, objtype):
print('On object {} , retrieve: {}'.format(obj, self._name))
return self._val
def __set__(self, obj, val):
print('On object {} , update: {}'.format(obj, self._name))
self._val = val
|
Use the descriptor in a class:
class MyClass:
x = ClsAccessor('x')
See the message printed while getting the attribute x:
>>> o = MyClass()
>>> print(o.x)
On object <__main__.MyClass object at 0x1011c02b0> , retrieve: x
None
Setting the attribute also shows a message:
>>> o.x = 10
On object <__main__.MyClass object at 0x1011c02b0> , update: x
>>> print(o.x)
On object <__main__.MyClass object at 0x1011c02b0> , retrieve: x
10
This naive descriptor has a problem. Because the attribute value is kept in
the descriptor object, and the descriptor is kept in the class object, attributes of all instances of MyClass
share the same value:
>>> o2 = MyClass()
>>> print(o2.x) # Already set, not None!
On object <__main__.MyClass object at 0x1011c02e0> , retrieve: x
10
>>> o2.x = 100 # Set the value on o2.
On object <__main__.MyClass object at 0x1011c02e0> , update: x
>>> print(o.x) # The value of o changes too.
On object <__main__.MyClass object at 0x1011c02b0> , retrieve: x
100
Keep Data on the Instance#
Having all instances sharing the attribute value usually undesirable, but of course the descriptor protocol allows to bind the values to the instance. Let us change the accessor class a little bit:
1 2 3 4 5 6 7 8 9 10 11 12 13 14 | class InsAccessor:
"""Routing access to all instance attributes to alternate names on the instance."""
def __init__(self, name):
self._name = name
def __get__(self, obj, objtype):
print('On object {} , instance retrieve: {}'.format(obj, self._name))
varname = '_acs' + self._name
if not hasattr(obj, varname):
setattr(obj, varname, None)
return getattr(obj, varname)
def __set__(self, obj, val):
print('On object {} , instance update: {}'.format(obj, self._name))
varname = '_acs' + self._name
return setattr(obj, varname, val)
|
The key of preserving the value in the instance is in lines 7 and 13. We mangle the variable name and use it to add a reference on the instance. Now add the descriptor to a class:
class MyClass2:
x = InsAccessor('x')
Create the first instance. The descriptor can correctly set and retrieved:
>>> mo = MyClass2()
>>> print(mo.x) # The value is uninitialized
On object <__main__.MyClass2 object at 0x101190250> , instance retrieve: x
None
>>> mo.x = 10
On object <__main__.MyClass2 object at 0x101190250> , instance update: x
>>> print(mo.x)
On object <__main__.MyClass2 object at 0x101190250> , instance retrieve: x
10
Create another instance. According to our implementation, what we did in the first instance is not seen in the second one:
>>> mo2 = MyClass2()
>>> print(mo2.x) # The value remains uninitialized
On object <__main__.MyClass2 object at 0x101190a90> , instance retrieve: x
None
Metaclass#
Metaclasses is a mechanism to perform meta-programming in Python. That is, metaclasses change how the Python code works by writing Python code, but do not use a code generator.
Class is an Object#
In Python, a class is also an object, which is of the type
“type”. Let us observe this interesting fact. Make a
class:
class ClassIsObject:
pass
The class can be manipulated like a normal object:
>>> print(ClassIsObject) # Operate the class itself, not the instance of the class
<class '__main__.ClassIsObject'>
The class has its own namespace (__dict__):
>>> print(ClassIsObject.__dict__) # The namespace of the class, not of the instance
{'__module__': '__main__',
'__dict__': <attribute '__dict__' of 'ClassIsObject' objects>,
'__weakref__': <attribute '__weakref__' of 'ClassIsObject' objects>,
'__doc__': None}
The class is an object as well as a type.
A type is also an object:
>>> isinstance(ClassIsObject, object)
True
>>> isinstance(ClassIsObject, type)
True
>>> isinstance(type, object)
True
Customize Class Creation#
Now we can discuss how to customize class creation using metaclasses, after knowing that the classes are just Python objects. We will continue to use the accessor example in Descriptor. In the previous example, the descriptor object needs to take an argument for its name:
x = InsAccessor('x')
I would like to lift that inconvenience. First, I create a new descriptor:
1 2 3 4 5 6 7 8 9 10 11 12 13 14 | class AutoAccessor:
"""Routing access to all instance attributes to alternate names on the instance."""
def __init__(self):
self.name = None
def __get__(self, obj, objtype):
print('On object {} , auto retrieve: {}'.format(obj, self.name))
varname = '_acs' + self.name
if not hasattr(obj, varname):
setattr(obj, varname, None)
return getattr(obj, varname)
def __set__(self, obj, val):
print('On object {} , auto update: {}'.format(obj, self.name))
varname = '_acs' + self.name
return setattr(obj, varname, val)
|
The new descriptor class AutoAccessor does not take the attribute
name in the constructor. Then I create a corresponding metaclass:
1 2 3 4 5 6 7 8 9 10 11 12 13 14 15 | class AutoAccessorMeta(type):
"""Metaclass to use the new automatic descriptor."""
def __new__(cls, name, bases, namespace):
print('DEBUG before names:', name)
print('DEBUG before bases:', bases)
print('DEBUG before namespace:', namespace)
for k, v in namespace.items():
if isinstance(v, AutoAccessor):
v.name = k
# Create the class object for MyAutoClass.
newcls = super(AutoAccessorMeta, cls).__new__(cls, name, bases, namespace)
print('DEBUG after names:', name)
print('DEBUG after bases:', bases)
print('DEBUG after namespace:', namespace)
return newcls
|
The metaclass AutoAccessorMeta assigns the correct attribute name.
We will compare the effects of the metaclass by creating two classes. The
first is to use the AutoAccessor without the metaclass:
>>> class MyAutoClassDefault(metaclass=type):
... x = AutoAccessor() # Note: no name is given.
...
>>> # Nothing happens and it is not right.
>>> ao = MyAutoClassDefault()
>>> ao.x
On object <__main__.MyAutoClassDefault object at 0x101232040> , auto retrieve: None
Traceback (most recent call last):
File "<stdin>", line 1, in <module>
File "/path/to/autoaccessor.py", line 8, in __get__
varname = '_acs' + self.name
TypeError: can only concatenate str (not "NoneType") to str
The second is to use the metaclass. The metaclass scans the class namespace and assigns the attribute name to the corresponding descriptor:
>>> class MyAutoClass(metaclass=AutoAccessorMeta):
... x = AutoAccessor() # Note: no name is given.
...
DEBUG before names: MyAutoClass
DEBUG before bases: ()
DEBUG before namespace: {'__module__': '__main__',
'__qualname__': 'MyAutoClass',
'x': <__main__.AutoAccessor object at 0x10117bcd0>}
DEBUG after names: MyAutoClass
DEBUG after bases: ()
DEBUG after namespace: {'__module__': '__main__',
'__qualname__': 'MyAutoClass',
'x': <__main__.AutoAccessor object at 0x10117bcd0>}
Now we successfully upgrade the descriptor to avoid the explicit argument for the attribute name:
>>> ao = MyAutoClass()
>>> print(ao.x) # The value is uninitialized
On object <__main__.MyAutoClass object at 0x101190460> , auto retrieve: x
None
>>> ao.x = 10
On object <__main__.MyAutoClass object at 0x101190460> , auto update: x
>>> print(ao.x)
On object <__main__.MyAutoClass object at 0x101190460> , auto retrieve: x
10
>>> print(ao._acsx)
10
Abstract Base Class (ABC)#
Python is object-oriented and supports inheritance. Most of the time we use a simple inheritance relation, and it works as expected.
>>> class MyBaseClass:
... pass
...
>>> class MyDerivedClass(MyBaseClass):
... pass
...
>>> base = MyBaseClass()
>>> derived = MyDerivedClass()
The instance “base” instantiated from MyBaseClass is an
instance of MyBaseClass but not MyDerivedClass:
>>> print('base {} MyBaseClass'.format(
... 'is' if isinstance(base, MyBaseClass) else 'is not'))
base is MyBaseClass
>>> print('base {} MyDerivedClass'.format(
... 'is' if isinstance(base, MyDerivedClass) else 'is not'))
base is not MyDerivedClass
The instance “derived” instantiated from MyDerivedClass is an
instance of both MyBaseClass and MyDerivedClass:
>>> print('derived {} MyBaseClass'.format(
... 'is' if isinstance(derived, MyBaseClass) else 'is not'))
derived is MyBaseClass
>>> print('derived {} MyDerivedClass'.format(
... 'is' if isinstance(derived, MyDerivedClass) else 'is not'))
derived is MyDerivedClass
Nothing surprises. But Python also supports Abstract Base Class (abc) and to turn it up side down.
Method Resolution Order (MRO)#
When we need to use ABC, the inheritance is usually much more complex than what we just described and involves multiple inheritance. There needs to be a definite way to resolve the multiple inheritance and Python uses the “C3” algorithm [2]. The description can also be found in the Python method resolution order (MRO) [3].
Let us see how MRO works with a single-level inheritance:
1 2 3 4 5 6 7 8 9 10 11 12 13 14 15 16 | class A:
def process(self):
print('A process()')
class B(A):
def process(self):
print('B process()')
super(B, self).process()
class C(A):
def process(self):
print('C process()')
super(C, self).process()
class D(B, C):
pass
|
In the above code, the inheritance relationship among the four classes form a “diamond”:
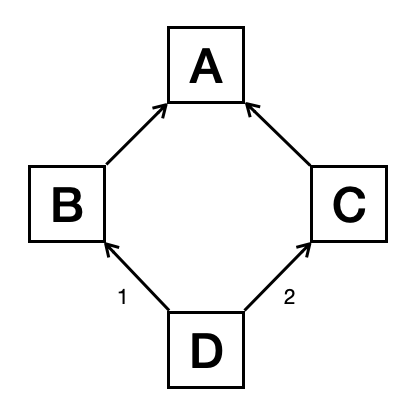
The MRO in the diamond inheritance is:
>>> print(D.__mro__)
(<class '__main__.D'>,
<class '__main__.B'>, <class '__main__.C'>,
<class '__main__.A'>, <class 'object'>)
>>> obj = D()
>>> obj.process()
B process()
C process()
A process()
If we change the order in the inheritance declaration:
class D(C, B):
pass
the inheritance diagram becomes:
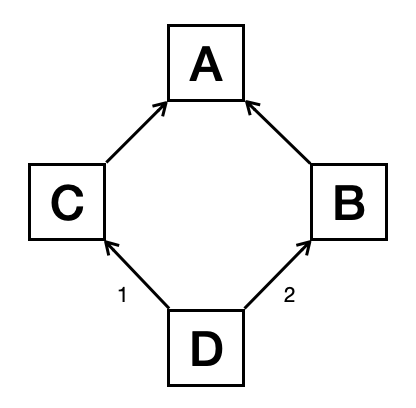
and the MRO changes accordingly:
>>> print(D.__mro__)
(<class '__main__.D'>,
<class '__main__.C'>, <class '__main__.B'>,
<class '__main__.A'>, <class 'object'>)
In a more complex inheritance relationship, there may not be a single diamond. The following example have 3 diamonds crossing multiple levels:
1 2 3 4 5 6 7 | O = object
class F(O): pass
class E(O): pass
class D(O): pass
class C(D, F): pass
class B(D, E): pass
class A(B, C): pass
|
The inheritance diagram is:
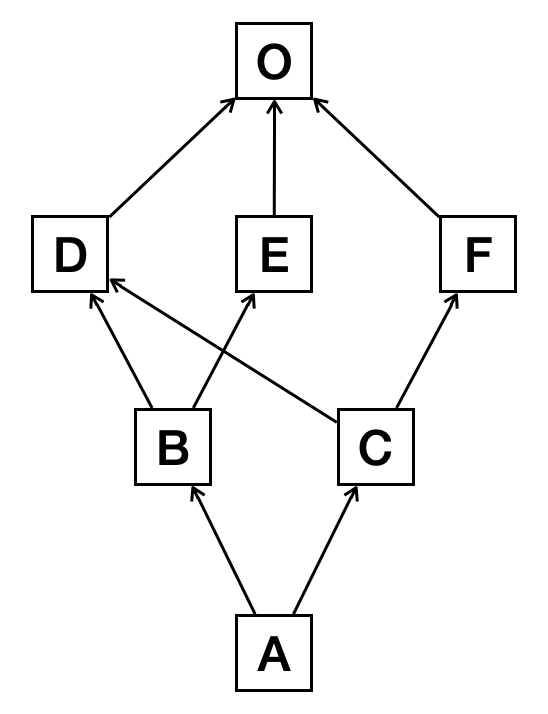
The MRO of the complex inheritance is:
>>> print(A.__mro__)
(<class '__main__.A'>, <class '__main__.B'>, <class '__main__.C'>, <class '__main__.D'>,
<class '__main__.E'>, <class '__main__.F'>, <class 'object'>)
>>> print(B.__mro__)
(<class '__main__.B'>, <class '__main__.D'>, <class '__main__.E'>, <class 'object'>)
>>> print(C.__mro__)
(<class '__main__.C'>, <class '__main__.D'>, <class '__main__.F'>, <class 'object'>)
>>> print(D.__mro__)
(<class '__main__.D'>, <class 'object'>)
>>> print(E.__mro__)
(<class '__main__.E'>, <class 'object'>)
>>> print(F.__mro__)
(<class '__main__.F'>, <class 'object'>)
And an instance of A is an instance of all the classes based on
the inheritance rule:
>>> a = A()
>>> print('a {} A'.format('is' if isinstance(a, A) else 'is not'))
a is A
>>> print('a {} B'.format('is' if isinstance(a, B) else 'is not'))
a is B
>>> print('a {} C'.format('is' if isinstance(a, C) else 'is not'))
a is C
>>> print('a {} D'.format('is' if isinstance(a, D) else 'is not'))
a is D
>>> print('a {} E'.format('is' if isinstance(a, E) else 'is not'))
a is E
>>> print('a {} F'.format('is' if isinstance(a, F) else 'is not'))
a is F
Note
In production code, we usually do not want to deal with inheritance that is so complex. If possible, try to avoid it through the system design.
Virtual Base Class#
Python abstract base class (abc) provides the
capabilities to overload isinstance() and
issubclass(), and define abstract methods.
We can use abc.ABCMeta.register() method to ask a class
MyABC that is not in a inheritance chain of another class
A to be a “virtual” base class of the latter.
import abc

class MyABC(metaclass=abc.ABCMeta):
    pass
Warning
Python “virtual” base classes have nothing to do with the C++ virtual classes.
As we know, A is not a subclass of MyABC:
>>> print('A {} a subclass of MyABC'.format('is' if issubclass(A, MyABC) else 'is not'))
A is not a subclass of MyABC
But once we “register” MyABC to be
a virtual base class of A, we will see A becomes
subclass of MyABC:
>>> MyABC.register(A)
<class '__main__.A'>
>>> print('A {} a subclass of MyABC'.format('is' if issubclass(A, MyABC) else 'is not'))
A is a subclass of MyABC
Abstract Methods#
Using abc, we can add abstract methods to an class (making it
abstract).
class AbstractClass(metaclass=abc.ABCMeta):
    @abc.abstractmethod
    def process(self):
        pass
An abstract class cannot be instantiated:
>>> a = AbstractClass()
Traceback (most recent call last):
  File "<stdin>", line 1, in <module>
TypeError: Can't instantiate abstract class AbstractClass with abstract method process
In a derived class, the abstract method needs to be overridden
class GoodConcreteClass(AbstractClass):
    def process(self):
        print('GoodConcreteClass process')
Then the good concrete class can run.
>>> g = GoodConcreteClass()
>>> g.process()
GoodConcreteClass process
If the abstract method is not overridden
class BadConcreteClass(AbstractClass):
    pass
the derived class cannot run.
>>> b = BadConcreteClass()
Traceback (most recent call last):
  File "<stdin>", line 1, in <module>
TypeError: Can't instantiate abstract class BadConcreteClass with abstract method process